
As we promised a few weeks ago, welcome to the first post in a series where we’ll explore a full end-to-end app developed with the Visual Studio 3D Starter Kit. During this series we’ll develop a 3D dice roller that allows you to roll a 6-sided die by tapping or clicking it. In the process of rolling a number, the die will jump and flip in the air. This app will also work on Windows 8’s snap view, so that users can still roll dice while working on other apps. Finally, we’ll show you how to make this app compatible with Windows RT devices and port it to Windows Phone.
This first post will cover the basics of creating the app to the point where we can render the die to the screen and apply a texture. We’ll also review the Visual Studio Graphics tools, which are included in Visual Studio Professional or greater. If you only have Visual Studio Express 2012 for Windows 8, don’t worry, you’ll still be able to use this walkthrough.
The hardest part about learning Direct3D development is the need to learn many new concepts, such as coding HLSL shaders and how to convert meshes into runtime formats. There are many Visual Studio tools make this process much easier, letting you focus on your app logic instead of dealing with all those new concepts. And whenever you’re ready you can add more advanced features to your app without having to start over. Throughout this series, we’ve provided a number of links to additional documentation about DirectX features that we use, so you may want to follow these links to explore more about DirectX and graphics programming.
Let’s stop talking and start designing our app!
The demo app: a dice roller
Dice are used for a variety of board games and gambling. Making a simple dice roller app is an easy task in any programming language – a random number generator is only one line of code in many languages. But how can we make this app more interesting?

Let’s make it 3D, of course! We will develop our full game and assets using only Visual Studio 2012 Professional (look ma, no 3D modeling tool!). Let’s start!
Starting with a clean slate
The first step to use the Visual Studio 3D Starter Kit is to download and open it. You can get the full Starter Kit from https://aka.ms/vs3dkit. We have also prepared a special version of the Starter Kit (Windows Store only) for this tutorial that starts with a completely blank screen with no 3D models, so we can explore how to create our own assets. You can get that version on CodePlex (direct download link on the tile below). This changeset also shows what has to be changed to remove all the content from the Starter Kit.
![]()
Note for Visual Studio Express users: You can download the assets used in this project by clicking the tile below. Just add them to your project at the appropriate points in the walkthrough below.

If you run this app, you’ll see the Starter Kit’s teapot splash screen, followed by an empty gray screen. Don’t worry, we’ll fill it up soon…
Creating and displaying a mesh
Let’s start by creating the only mesh we will use in this app – a 3D cube that will be used as our die. To do that, on the Visual Studio Solution Explorer, right click the Shared/Assets folder in the StarterKit project and select Add -> New item… -> Graphics -> 3D Scene (.fbx). Let’s call it “Die.fbx”. The figure below shows what the Visual Studio Mesh Editor looks like:

To add a cube, open the Toolbox and double-click the “Cube” option. You can also add some other simple shapes like cylinders and teapots, and even do some light editing such as rotating, scaling and translating your 3D models.
To show the cube on the screen, we’ll have to add some code to our game in order to load the mesh and render it. In the Starter Kit, the Game class (Game.cpp/Game.h) contains our game rendering logic, and that is the place where this code should be added.
The first step is to load the mesh from the file when the app is initialized. Add the following code in the Game::Initialize() method:
void Game::Initialize()
{
    Mesh::LoadFromFile(m_graphics, L"die.cmo", L"", L"", m_meshModels);
}
This code uses the Starter Kit’s Mesh class to load the Die model from the file into the m_meshModels vector.
- The first parameter, m_graphics, contains an instance of the Graphics class, which groups all the useful DirectX objects in one single place.
- The second parameter is the file name. The file uses the “.cmo” extension because at build time all the assets are converted to a simpler format, more suitable for runtime. Meshes are compiled to “compiled mesh object” (CMO) files, shaders are compiled using the standard FX compiler to “compiled shader object” (CSO) files, and images (PNG, JPG, etc.) are compiled to runtime-optimized DDS (DirectDraw Surface) files.
- The third and fourth parameters contain the relative path where the app should look for shader objects (CSO files) and texture objects (DDS files) used in this mesh. You will rarely need to change the default values.
- The last parameter is a reference to a std::vector of Meshes where the loaded meshes should be stored.
The next step is to render the cube at each frame. To do that, add the following code to the Game::Render() method:
void Game::Render()
{
    GameBase::Render();
    // clear
    m_d3dContext->OMSetRenderTargets(
        1,
        m_d3dRenderTargetView.GetAddressOf(),
        m_d3dDepthStencilView.Get()
        );
    m_d3dContext->ClearRenderTargetView(
        m_d3dRenderTargetView.Get(),
        DirectX::Colors::DarkSlateGray
        );
    m_d3dContext->ClearDepthStencilView(
        m_d3dDepthStencilView.Get(),
        D3D11_CLEAR_DEPTH,
        1.0f,
        0
        );
    XMMATRIX transform = XMMatrixIdentity();
    for (UINT i = 0; i < m_meshModels.size(); i++)
    {
        m_meshModels[i]->Render(m_graphics, transform);
    }
    //
    // only enable MSAA if the device has enough power
    //
    if (m_d3dFeatureLevel >= D3D_FEATURE_LEVEL_10_0)
    {
        // (... MSAA code ...)
    }
}
This code calls each mesh’s Render method in order to show the mesh on the screen. The transform matrix contains the transformations (scaling, translation, rotation, etc.) that we want to apply to each mesh. In this case, we applied the Identity matrix, which renders the object without any visual changes.
If you run the app right now you’ll see a cube in the middle of the screen:

The cube seems a little small, isn’t it? Let’s bring the camera a little bit closer. Change the following line in the Game::CreateWindowSizeDependentResources() method:
m_graphics.GetCamera().SetPosition(XMFLOAT3(0.0f, 2.0f, -6.0f));
This method is called every time the window size changes (e.g. resolution change, snap view), so this is a good place to create and modify camera properties. The line we changed sets the camera position; you can also change the field of view (fovAngleY in the StarterKit code) to make objects appear bigger or smaller without changing the camera position.
Adding a texture
In this sample we’ll give you a texture for the die faces. It’s really simple, but it gives you a good starting point to make your own later using other tools.
The image below shows what the texture looks like. You can get the texture here.

To use the texture, first copy the file to your Assets folder. Then, back in Visual Studio, right-click the Assets folder on Solution Explorer, choose Add -> Existing item… and select your image.
The final step is to apply the texture to the cube. To do that, open the Die mesh (Die.fbx) and click on the cube. On the Properties tool window (shortcut: Alt+Enter), look for a property called “Texture1”. Click the “…” button to find your image and apply it to the cube.
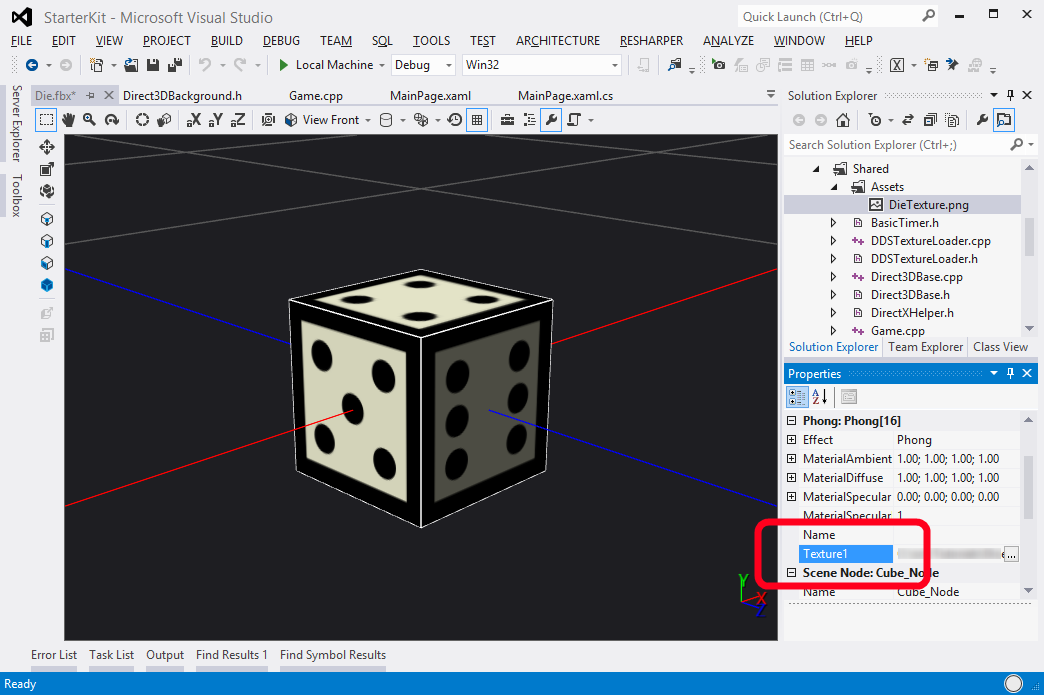
If you run the app again, you will see that the die already has numbers in the correct positions.
You can get the app in this state on CodePlex (direct download link on the tile below).

In our next post, we’ll add some animation code and get this die rolling! See you then!
Updated April 2, 2013 – fixed a broken link to CodePlex.
0 comments