Walkthrough: Creating a Custom Start Page – Part 2
This is the second of a two part walkthrough on creating a personalized version of the Start Page which enables users to change a background image. This post builds on the project we created previously. If you have not already done so, I recommend going through part one of the walkthrough before continuing on.
We will cover the following topics:
|
· Adding code-behind to a Start Page · Persisting user settings using the Visual Studio Settings Store · Sharing a Start Page on the Visual Studio Gallery |
|
Adding Code Behind to a Start Page
The page created at the end of the previous walkthrough is fine if you are happy hard coding an image. However if you want the ability to change the image without editing the XAML each time, we will need to add some C# code to handle this feature. During this section we are going to add the ability to open the file browser dialog so that the user can choose which image to display as the background. You may remember that in the previous walkthrough we removed the example Start Page UserControl from the Start Page XAML. In this walkthrough, we’ll modify the UserControl and place it on the Start Page.
1. Adding UI to change the background image
2. Using the Open File Dialog to select an image file.
3. Creating a Dependency Property to store an image location.
4. Binding an image source to a user control dependency property
Adding UI to change the background image
In these next steps we will remove the unnecessary XAML in the user control and add a button with an event handler.
|
1. |
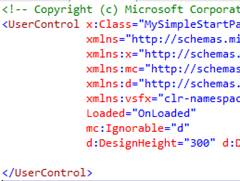
Open the MyControl.xaml file and switch to the XAML View, delete the contents of the user control so it looks like the following: |
|
|
2. |
Add a Button into the UserControl, name it and add a click event handler. This can be automatically ‘wired up’ by pressing the tab key when the ‘<New Event Handler>’ popup appears. |
|
|
3. |
Finally add a caption into the Button content. The end result should be as follows: <Button x:Name=”ChooseImageButton” Click=”ChooseImageButton_Click”>Choose Background Image</Button> |
Using the Open File Dialog to select a background image for the Start Page
In order for a user to choose which image to display as the background, we will need to use a file browser dialog to select an image from the file system. For the rest of this section we will be working in the UserControl code-behind file, MyControl.xaml.cs.
|
1. |
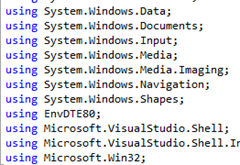
Add the following using statement at the top of the code file. using Microsoft.Win32; By default the namespace for file dialogs is not included in the template. |
|
2. |
Navigate to the Button Click event handler which was added from the designer surface. This is where we will add the code to open a file dialog and set the background image. We only want to allow users to pick .jpg or .png files to use as a background so a filter is added to the dialog for files which have these extensions. /// <summary> /// Launches the open file dialog box /// </summary> /// <param name=”sender”></param> /// <param name=”e”></param> private void ChooseImageButton_Click(object sender, RoutedEventArgs e) { // Create Instance of Open File Dialog OpenFileDialog dlg = new OpenFileDialog(); // Filter dialog to show only images dlg.Filter = “Images (*.PNG;*.JPG;)|*.PNG;*.JPG;”; // Show open file dialog box Nullable<bool> result = dlg.ShowDialog(); } For more information on the open file dialog, check out the MSDN article: http://msdn.microsoft.com/en-us/library/microsoft.win32.openfiledialog.aspx |
Using a WPF Dependency Property to store the image location
Now that we have a way to select an image, we need to create a WPF Dependency Property to temporarily store the image location. Using a Dependency Property allows us to use data binding between the source and the Image control on the Start Page.
|
1. |
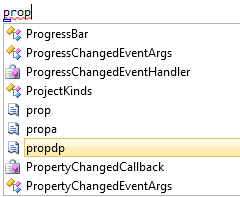
To easily add a Dependency Property, type “propdp” and press tab twice. This will create the Dependency Property outline for you using a code snippet. Be sure to do this outside of any method in the class. |
|
2. |
Edit the Dependency Property template so the end result is as follows: public string StartPageImage { get { return (string)GetValue(StartPageImageProperty); } set { SetValue(StartPageImageProperty, value); } } // Using a DependencyProperty as the backing store for StartPageImageProperty. This enables animation, styling, binding, etc… public static readonly DependencyProperty StartPageImageProperty = DependencyProperty.Register(“StartPageImage”, typeof(string), typeof(MyControl), null); For more information on dependency properties check out the MSDN article: http://msdn.microsoft.com/en-us/library/ms752914.aspx |
|
3. |
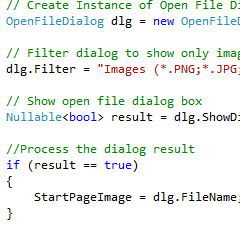
Navigate back to the Button Click event handler where the file dialog code was added. To store the image location from the file dialog in this new property, add the following code after the dlg.ShowDialog() call. //Process the dialog result |
|
|
4. |
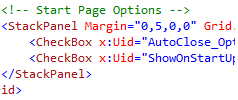
Switch back to the StartPage.xaml file and re-expand the Grid with the comment of ‘<!–Left Column–>’. Scroll down to the Start Page Options section as this is where we will place the control. |
|
|
5. |
The namespace for the UserControl has already been included in the template, so all we need to do is add an instance of the control to the page. <my:MyControl x:Name=”ImageController”/> |
|
6. |
Now all that is left to do is to replace the hardcoded Image Source at the top of the StartPage.XAML file with a Binding to the UserControl we just added. <Image Source=”{Binding ElementName=ImageController,Path=StartPageImage}” Stretch=”UniformToFill”/> |
Using the Visual Studio Settings Store
Having code behind to enable users to change their Start Page is all well and good but when the user closes the current VS session, that information will be lost. Visual Studio has a built in settings store where users can persist data across sessions. The settings store works on the concept of collections, and each extension wishing to store data should do so in its own collection. These are easily created and accessed by name. The Start Page project template automatically creates a collection for you if you want to store user settings.
This section will go over the basics of how to use this store. We’ll start by retrieving a previously stored value.
|
1. |
Open the MyControl.XAML.CS file and Navigate to the OnLoaded event handler and uncomment the setting store example code. Update the names of the variables in the example code to be more relevant to this scenario. string path = StartPageSettings.RetrieveString(“ImageSource”); |
|
2. |
Add the following code to check that the stored value is not null and is a valid file path. The end result should look like this: // Load control user settings from previous session. |
3. |
Add the following code to the ChooseImageButton_Click event handler to store the image chosen by the user. The end result should look like this: // Process open file dialog box results |
Build and Run the extension, the end result will store the image file path across Visual Studio sessions.
Note: if your page is not displayed in the Experimental instance, Open the Tools->Options->Startup settings, and select ‘[Installed Extension] SolutionName’ from the list.
For more information on the settings store, check out the MSDN article: http://msdn.microsoft.com/en-us/library/ff460144.aspx
Uploading a Start Page to the Visual Studio Gallery
Now the extension is complete and ready to be showcased on the Visual Studio Gallery. These next steps will go through taking the VSIX file generated by the template and publishing it as a free extension. Before publishing, you should ensure the content in your VSIX file contains an accurate description of your extension.
|
1. |
Copy the file Path to the output directory of the solution; this will make locating the file easier when in the upload process. One of the quickest ways to get this path is to click on the ‘Open Folder in Windows Explorer’ command in the solution explorer context menu. |
|
|
2. |
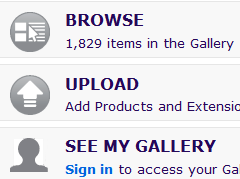
Go to the Visual Studio Gallery and click the Upload button. |
|
|
3. |
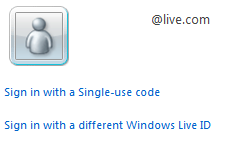
If you are not already signed in with a Windows Live ID, you will be Prompted to sign in at this point. |
|
|
4. |
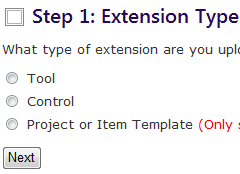
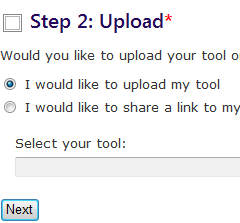
Once signed in, Select ‘Tool’ as the Extension Type and click the ‘Next’ button. |
|
5. |
Select the ‘upload my tool’ and click the browse button to specify the file to upload. |
|
6. |
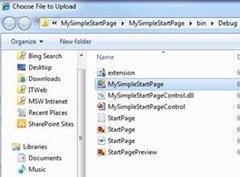
Paste the path copied from the bin directory of the extension and select the ‘MySimpleStartPage’ VSIX file. Once the path has been added to the page, click the ‘Next’ button. |
|
7. |
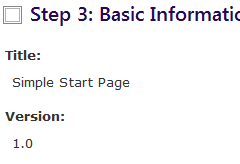
Fill in the meta-data for this extension, in this example, we can just check the ‘Start Pages’ category and add a brief description. |
|
8. |
Before clicking the ‘Create Contribution’ button you will need to agree to the Contribution Agreement. After clicking the ‘Create Contribution button, the Visual Studio Gallery will create a page for your extension based on the information entered here. Note: The extension is not public until this page is ‘published’. |
|
9. |
Click the ‘publish’ link to make your extension publically available. |
|
There is still plenty of room to expand on this sample and indeed start page customization in general; personally I think customizing the start page is a great way to start learning how to extend VS.
Check out the Start Pages currently on the Gallery . Hopefully this post will inspire some additions to this list.
Thanks for your time,
Adrian Collier

![clip_image002[4]_thumb[1] clip_image002[4]_thumb[1]](https://devblogs.microsoft.com/visualstudio/wp-content/uploads/sites/4/2010/07/8551.clip_image0024_thumb1_0FB01CEA.jpg)




 Light
Light Dark
Dark
0 comments