SharePoint Calculator Service Part 3 – The Service Application
In Part 2 of this series, we integrated our Calculator service with the SharePoint server farm topology by extending the SPIisWebService and SPIisWebServiceInstance classes. These two classes allow administrators to use the SharePoint UX to view the topology and to start and stop our service host process on any server in the server farm. However, we haven’t yet created a service application to host, so this isn’t very useful yet.
In this article, we’ll create a service application by extending the SPIisWebServiceApplication class.
CalculatorServiceApplication.cs
- [System.Runtime.InteropServices.Guid("AF113976-8384-47CD-8055-0DD6C742B301")]
- internal sealed class CalculatorServiceApplication : SPIisWebServiceApplication
- {
- internal CalculatorServiceApplication(
- string name,
- CalculatorService service,
- SPIisWebServiceApplicationPool applicationPool)
- : base(name, service, applicationPool)
- {
- }
- protected override string InstallPath
- {
- get
- {
- return SPUtility.GetGenericSetupPath(@"WebServices\Sample.Calculator");
- }
- }
- protected override string VirtualPath
- {
- get
- {
- return "calculator.svc";
- }
- }
- }
The base class requires two abstract methods, InstallPath and VirtualPath, to be implemented.
The InstallPath property (lines 12-18) tell SharePoint where to find our service files. This property should return the fully qualified path to a directory in the local server file system that contains our calculator.svc and web.config files. When the service application is provisioned (started) on a given server, SharePoint will create an IIS virtual directory that points to this path.
In this implementation, I am using the SPUtility.GetGenericSetupPath() helper method which returns a path relative to the SharePoint installation directory, in this case, under the “WebServices\Sample.Calculator” directory. Note that there will be other services in the “WebServices” directory, so be sure to use something unique, like your company name, as a prefix for your subdirectory.
The VirtualPath property (lines 20-26) tells SharePoint the URI of your service endpoint relative to the InstallPath directory, in this case, “calculator.svc”. This will be appended to the URI that identifies that IIS virtual directory where our service application is provisioned in IIS, for example, <server1/vdir/calculator.svc>. SharePoint will take care of figuring out the base portion of the URI, e.g., <server1/serviceapp1>, which is different for each server hosting our service (service instance) and for each service application. We just need to specify anything else that should be tacked on to the end of that path.
Now to finish up, we need some way to create this directory on each server and install the calculator.svc and web.config files. Normally, you would do this using an MSI or a SharePoint solution, but to keep things simple for now, we’ll just use a batch file to xcopy the files.
install.cmd
- @echo off
- setlocal
- set _INSTALLUTIL=%SystemRoot%\Microsoft.NET\Framework64\v2.0.50727\InstallUtil.exe
- set _INSTALLPATH=%CommonProgramFiles%\Microsoft Shared\web server extensions\14
- set _APPNAME=Sample.Calculator
- set _SETUPPATH=%~dp0.
- echo Installing service from '%_SETUPPATH%' to '%_INSTALLPATH%\WebServices\%_APPNAME%'...
- xcopy /y "%_SETUPPATH%\*.svc" "%_INSTALLPATH%\WebServices\%_APPNAME%\*.*"
- xcopy /y "%_SETUPPATH%\web.config" "%_INSTALLPATH%\WebServices\%_APPNAME%\*.*"
- %_INSTALLUTIL% "%_SETUPPATH%\%_APPNAME%.Service.dll"
- echo Setup complete.
A SharePoint administrator can run this batch file on each server in a farm to install the Calculator service. Note that the batch file assumes that the calculator.svc and web.config files are in the same directory as the batch file (line 7).
That’s it! We’ve created a service application and a script to deploy it to a server farm.
So what do we get for this work?
Well, a SharePoint administrator can now create a Calculator service application and deploy it to all of the online Calculator service instances in the server farm using the PowerShell console. For example:
PS> [System.Reflection.Assembly]::LoadWithPartialName("Sample.Calculator.Service")
PS> $instance = Get-SPServiceInstance | where { $_.GetType().Name -eq "CalculatorServiceInstance" } | select -first 1
PS> $service = $instance.Service
PS> $appPool = Get-SPServiceApplicationPool | select -first 1
PS> $app = New-Object Sample.Calculator.Service.Administration.CalculatorServiceApplication "CalculatorApp1", $service, $appPool
PS> $app.Update()
PS> $app.Provision()
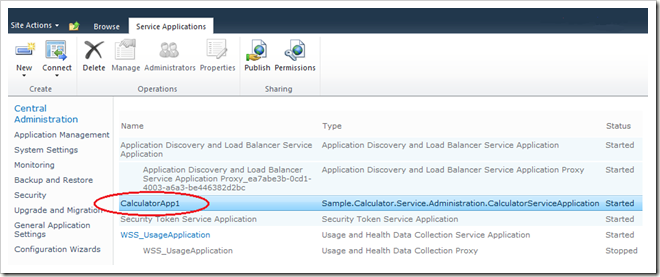
After executing these commands on any one server, we’ll have a brand new service application named “CalculatorApp1” deployed to all of the service instances in the server farm. And, the administrator can start and stop service instances to provision and un-provision the IIS-hosted web service on any server at any time.
Here’s what our service application looks like in the “Manage Service Applications” UX:
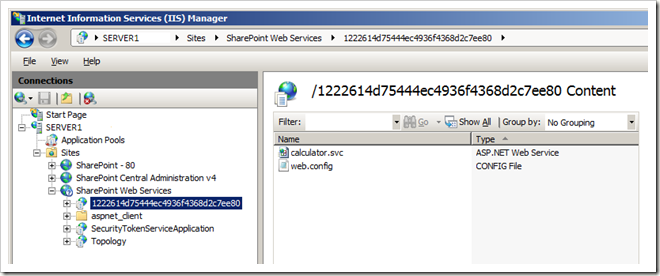
And here’s what it looks like in IIS Manager (on a server where the Calculator service instance has been started):
Note that SharePoint has created a virtual directory under the “SharePoint Web Services” IIS site, and that it contains our service files. The virtual directory name is a GUID which uniquely identifies the service application we created.
If we create a second service application, another virtual directory will be created with a different identifier. However, both virtual directories will point to the same physical directory in the file system (the one we specified in our service application InstallPath property).
So it works, but creating the service application sure wasn’t pretty. We’ll fix that next time.

