Checking the cabinet
Last time, we created a post-build step which would sign all files built into the build output directory. In most scenarios, this is just the MSI and the bootstrapper. However, if packaging loose or packaging with external cabs, these files will be signed as well. This could be a problem when packaging loose, as not all files can be signed. External cabs, though, can be signed. But to fully create the scenario, we need to add information into the msi so that the cab signature can be verified. We could use msicert.exe to do this, but who wants to download part of the SDK? There is also a walkthrough on MSDN which shows how to accomplish something like that.
It should be a fairly easy matter to modify the vbscript and execute it as part of the postbuild step to get this working. Unfortunately, I only said it should be easy. Because when I tried it, I couldn't get it working. I also tried translating it into a jscript, but I couldn't get that working either: I couldn't figure out how to write an array of bytes into a file using jscript. I know how to do that in the higher level languages like VB.NET, C++, or C#, so let's give it a try using one of those.
Which language to choose? I'm pretty sure we could get the job done with all three. But since I've been doing most of my at-home coding in C# lately, let's give that one a shot.
Let's design this to behave something like msicert.exe:
PopulateDigitalSignature.exe -d {database} -m {media entry} -c {cabinet}
We begin with a C# console application, "PopulateDigitalSignature". Because we will be making extensive use of the Windows Installer object model, we need to add a reference to "msi.dll" to this project. I will skip the coding for parsing command line arguments, and will go straight to the real Windows Installer coding:
   string databaseFileName = string.Empty;
 string cabinetFileName = string.Empty;
  string mediaEntry = string.Empty;
   string certificateFileName = string.Empty;

  try
 {
       // ... command line parsing ...

     Type classType = Type.GetTypeFromProgID("WindowsInstaller.Installer");
      Object installerClassObject = Activator.CreateInstance(classType);
      Installer installer = (Installer)installerClassObject;

      Array certificateArray = installer.FileSignatureInfo(cabinetFileName, 0, MsiSignatureInfo.msiSignatureInfoCertificate);
     certificateFileName = Path.GetTempFileName();
       using (BinaryWriter fout = new BinaryWriter(new FileStream(certificateFileName, FileMode.Open)))
        {
           fout.Write((byte[])certificateArray);
       }

       Database msi = installer.OpenDatabase(databaseFileName, MsiOpenDatabaseMode.msiOpenDatabaseModeTransact);
       View viewCert = msi.OpenView("SELECT * FROM `MsiDigitalCertificate`");
      viewCert.Execute(null);
     View viewSig = msi.OpenView("SELECT * FROM `MsiDigitalSignature`");
     viewSig.Execute(null);

      Record recordCert = installer.CreateRecord(2);
      recordCert.set_StringData(1, "Test");
       recordCert.SetStream(2, certificateFileName);
       viewCert.Modify(MsiViewModify.msiViewModifyInsert, recordCert);

     Record recordSig = installer.CreateRecord(4);
       recordSig.set_StringData(1, "Media");
       recordSig.set_StringData(2, mediaEntry);
        recordSig.set_StringData(3, "Test");
        viewSig.Modify(MsiViewModify.msiViewModifyInsert, recordSig);

       msi.Commit();
   }
   catch (Exception ex)
    {
       Console.WriteLine(string.Format("The following exception occurred: {0}", ex.Message));
  }
   finally
 {
       if (!string.IsNullOrEmpty(certificateFileName) && File.Exists(certificateFileName))
     {
           File.Delete(certificateFileName);
       }
   }
Most of this is a pretty straight-forward adaptation of the walk-through I alluded to before; let's go through it section by section and discuss what is really happening.
We start off with some local members for holding command line arguments, as well as the file name for the cab certificate information.
  string databaseFileName = string.Empty;
 string cabinetFileName = string.Empty;
  string mediaEntry = string.Empty;
   string certificateFileName = string.Empty;
We use a built in .NET functionality function to create the necessary WindowsInstaller.Installer object:
    try
 {
       // ... command line parsing ...

     Type classType = Type.GetTypeFromProgID("WindowsInstaller.Installer");
      Object installerClassObject = Activator.CreateInstance(classType);
      Installer installer = (Installer)installerClassObject;
Now that we have our installer object, we can get the signature information of the cabiet file, and write that out to a temporary file.
         Array certificateArray = installer.FileSignatureInfo(cabinetFileName, 0, MsiSignatureInfo.msiSignatureInfoCertificate);
     certificateFileName = Path.GetTempFileName();
       using (BinaryWriter fout = new BinaryWriter(new FileStream(certificateFileName, FileMode.Open)))
        {
           fout.Write((byte[])certificateArray);
       }
It will now be necessary to open the MSI and add the appropriate information into the MsiDigitalCertificate and MsiDigitalSignature tables.
         Database msi = installer.OpenDatabase(databaseFileName, MsiOpenDatabaseMode.msiOpenDatabaseModeTransact);
       View viewCert = msi.OpenView("SELECT * FROM `MsiDigitalCertificate`");
      viewCert.Execute(null);
     View viewSig = msi.OpenView("SELECT * FROM `MsiDigitalSignature`");
     viewSig.Execute(null);
Create a record for the MsiDigitalCertificateTable, and add our certificate name and certificate information
        Record recordCert = installer.CreateRecord(2);
      recordCert.set_StringData(1, "Test");
       recordCert.SetStream(2, certificateFileName);
       viewCert.Modify(MsiViewModify.msiViewModifyInsert, recordCert);
Create a record for MsiDigitalSignature table, and add the corresponding media table information
        Record recordSig = installer.CreateRecord(4);
       recordSig.set_StringData(1, "Media");
       recordSig.set_StringData(2, mediaEntry);
        recordSig.set_StringData(3, "Test");
        viewSig.Modify(MsiViewModify.msiViewModifyInsert, recordSig);
Finally, write out the modified database and delete the temporary certificate file.
         msi.Commit();
   }
   catch (Exception ex)
    {
       Console.WriteLine(string.Format("The following exception occurred: {0}", ex.Message));
  }
   finally
 {
       if (!string.IsNullOrEmpty(certificateFileName) && File.Exists(certificateFileName))
     {
           File.Delete(certificateFileName);
       }
   }
We compile this program and copy the file and the necessary interop assembly to the SetupSignCabs directory. Consistent with other setup projets, we add the program as an excluded file to the project. Note the setup project also automatically adds the interop assembly Interop.WindowsInstaller.dll as a detected dependnecy. Normally, we would exclude this as well, but I chose to leave it in because we need something to be written into the cab file; it might as well be this.
So the next step is to get this thing run as part of the post build step. This should look similar to the SignTool usage: we are running an executable, and have command-line arguments we need to pass. In particular, we need these three arguments:
- The name of the msi to add information to
- The media table entry
- The name of the signed cabinet file
The first two are pretty easy: we have accessed the built output filename several times in the past, and the second we can hard-code to "1". Its the last that proves slightly more difficult. We could hard-code the expected name of the cabinet file (setup.cab), but one hard-coded value is enough per blog entry. Looking back at our previous post-build project file, we see that it is possible to use wildcards when creating the items in an ItemGroup:
     <ItemGroup>
        <BuiltSetupFile Include="$(BuiltOutputDir)\*.*" />
    </ItemGroup>
We can use the same principle to find all generated cabinet files:
     <ItemGroup>
        <BuiltCabinetFile Include="$(BuiltOutputDir)\*.cab" />
    </ItemGroup>
So, calling our PopulateDigitalSignature tool should be this easy:
<Exec Command='"$(ProjectDir)\PopulateDigitalSignature.exe" -d "$(BuiltOutputPath)" -m 1 -c "%(BuiltCabinetFile.Identity)"' />
Opening the msi file in Orca, we see that the MsiDigitalCertificate and the MsiDigitalSignature tables seem to be populated as we would expect. So, we're done, right?
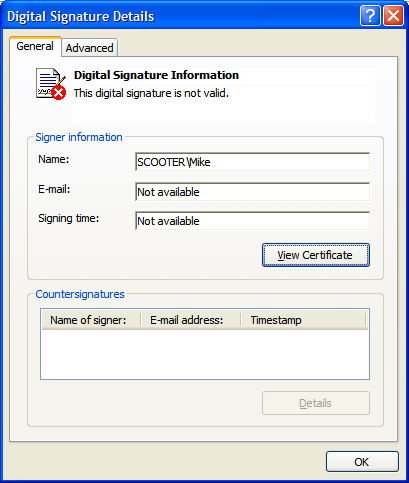
Not so fast there, Ace: there is a slight problem with our order of operations: we just signed the MSI file and then modified it. It seems like this would invalidate the signature on the MSI. Indeed, looking at the Digital Signatures tab of the MSI's file properties, and clicking on the Details button for the signature, we see a pretty strong indication that we just busted our signature:
So, we have to adjust our order of operations:
- Sign cabinet files
- Modify MSI file
- Sign the MSI file
The good news is that most of this work is already in place; we now how to deal with the cabinet files individually from the parameters to PopulateDigitalSignature. So, let's re-write the "SignSetup" task as:
     <Target Name="SignSetup">
        <ResolveKeySource
            CertificateFile="$(CertificateKeyFile)">
            <Output TaskParameter="ResolvedThumbprint" PropertyName="_ResolvedCertificateThumbprint" />
        </ResolveKeySource>

        <Exec Command='signtool.exe sign /sha1 $(_ResolvedCertificateThumbprint) "%(BuiltCabinetFile.Identity)"' />
        <Exec Command='"$(ProjectDir)\PopulateDigitalSignature.exe" -d "$(BuiltOutputPath)" -m 1 -c "%(BuiltCabinetFile.Identity)"' />
        <Exec Command='signtool.exe sign /sha1 $(_ResolvedCertificateThumbprint) "%(BuiltSetupFile.Identity)"' />
    </Target>
This does have the side-effect of signing our cabinet files twice. Technically, this shouldn't make a difference: signtool handles this just fine. But just for completeness sake, we choose to exclude the cabinet files from the BuiltSetupFile items by using the Exclude attribute; something like this should do it:
     <ItemGroup>
        <BuiltSetupFile Include="$(BuiltOutputDir)\*.*" Exclude="$(BuiltOutputDir)\*.cab" />
    </ItemGroup>
And looking at our built output this appears to do the trick.
This time around, we:
- Learned how to use the Windows Installer object model from a C# application
- Saw how to modify MSI table entries using this object model
- Learned how to Exclude items from an ItemGroup.
[This post written while listening to The Beatles]