Dimension Set Hierarchies
This post is supposed to help people understand how Dimension Set Hierarchies functionality should be used in Microsoft Dynamics AX 4.0 (earlier known as Axapta).
As far as I know, there is still no official whitepaper. Help texts exist, but don’t reflect the logic of the feature. I will try to fill this gap.
So, first of all: why do we need this feature? Sometimes we have to control dimensions entry to a transaction, e. g. along with Department A we may enter either Cost Center 1000 or Cost Center 1001, but prohibit Cost Center 2000. Sometimes we want such control to be applied on a particular ledger account, sometimes – on a particular journal. And we may also need to control dimensions entry for a group of related tables. This is what Dimension Hierarchies are used for.
Note: the examples below are based on a demo company, provided with the installation CD.
Let's set up the feature from scratch.
Use case:
There is a ledger account “110180 - Petty Cash”. We want to make sure, that whenever we use this account for posting, it is controlled by the following rules:
· either General or Finance department may be selected, and all the rest are not valid;
· whenever General department is selected – any cost center is allowed, but if Finance department is used – only cost centers 2010 and those starting with 1* are allowed.
OK, now we have to set up the system so that these rules are followed. This is very simple: we have to set up 3 things one after another: a dimension set, a dimension set hierarchy and finally a dimension set rule.
1. Before we begin, make sure that one of the parameters is set up: open “General Ledger > Setup > Parameters” and go to “Number sequences” tab-page. There is a reference named “Dimension priority ID”. If it is empty, then set it up by selecting any number sequence from the lookup. You will not find the generated values anywhere in the user interface because they are used internally, so just set this parameter up and close the Parameters form.
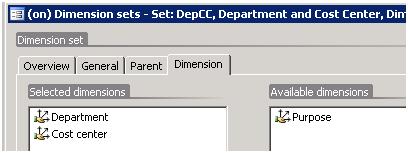
2. Then, we have to create a dimension set. A dimension set defines that one dimension depends on another one (note, that particular dimension values are not mentioned at this stage). In our case Cost Centers depend on Departments, therefore we have to create a dimension set, where Department dimension has the first priority, and Cost Center goes after. Open “General ledger > Setup > Dimensions > Dimension sets” menu item. You will see a form with two grids. In the upper grid, create a new record, setting “Set” field to “DepCC”, and “Description” to “Department and Cost Center”. Then open Dimension tab-page, move Department from the “Available dimensions” list to “Selected dimensions”, then move Cost center and finally press Ctrl+S to save the record. After you press Yes in a confirmation dialog, the dimension set is saved:
3. After we have specified what dimension depends on what, we have to create a dimension set hierarchy. We have just saved the dimension set, so the “Dimension set hierarchy” grid in the lower part of the form has become available for edition.
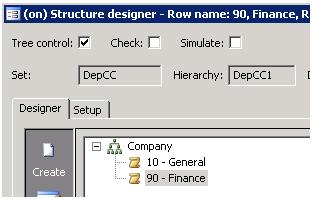
Create a new record in the grid, setting “Hierarchy” field value to “DepCC1” and “Description” to “Hierarchy 1”. After that, press “Structure designer” button. You will see the designer form, with a tree structure in the left part, and a grid in the right. This is where we specify valid dimension values. As you remember, the only departments we would like to be valid for our account are General and Finance. Drag these departments one by one from the grid and drop them onto the “Company” node in the tree:
The first priority dimensions are defined.
As we remember, any cost center is allowed for the first department; therefore we will not add any sub-nodes to “10 - General”.
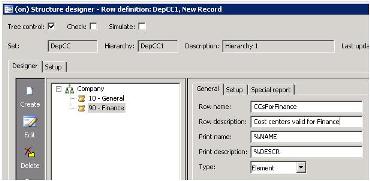
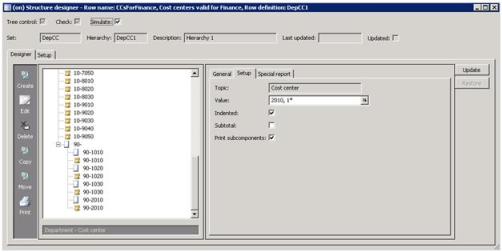
So, select “90 - Finance” tree node and press “Create” action button in the left part of the form. Now the designer is in the node creation mode. Set “Row name” to “CCsForFinance”, and “Row description” to “Cost centers valid for Finance”:
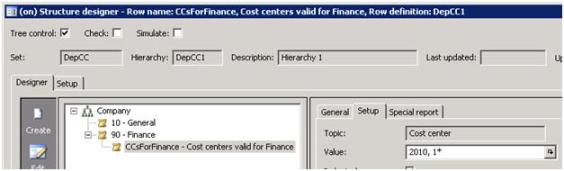
Then go to “Setup” tab-page of the same tab, change “Topic” field to “Cost center”, set “Value” to “2010, 1* ” and press Ctrl+S. You can see that the Finance department has a sub-node now:
The hierarchy is constructed.
But still we have to make it available for future use in the dimension set rules. In order to do that, we have to simulate the hierarchy, to see all the valid combinations “department – cost center”. But, before we simulate the hierarchy, we mark “Check” checkbox, so that any duplicate combinations will be found (if any), and only after that we mark “Simulate” checkbox, to run the simulation process. As a result, we see another structure:
The nodes with ”yellow scroll” icon represent valid dimension combinations (“blank list” nodes are not meaningful here so don’t pay attention to them). Well, we have generated all valid combinations – then we have to save them to make the hierarchy available for use. Press “Update” button in the right part of the designer (it becomes enabled as soon as we have the hierarchy simulated and there are no duplicates in the structure). After that the “Last updated” field in the form header is automatically set to the system date, and “Updated” checkbox is marked. The hierarchy is updated.
Close the designer form. You can see, that on "Dimension sets" form one of the checkmarks in front of the hierarchy name is marked now:
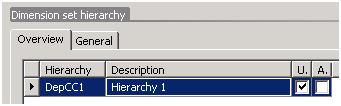
The hierarchy is updated, but we have to approve it, so mark the second checkbox:
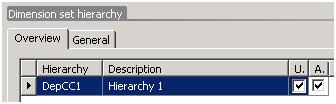
The hierarchy is updated and approved. Now we can proceed with the final step.
4. We have created the dimension set and the dimension set hierarchy. After that, we have to create a dimension set rule - to attach our validation rules to the ledger account.
Find “Dimension set rules” button on the “Dimension sets” form, and press it to open “Dimension set rules” form. You can see three grids in the form. The second grid represents dimension set rule collections, attached to the current dimension set (we may group dimension set rules to virtual collections and give these collections names). So, create a record in the collections grid and set its “Code” to “AccRules” and “Description” to “Rules for ledger accounts”:

The collection is created, now we may create dimension set rules, attached to this collection. Create a new record in the third grid, which actually represents dimension set rules. Set “Object type” to “Ledger account”, “Identification” to “110180”, and “Hierarchy” to “DepCC1”, and save the record.

We have just created the dimension set rule for the “Petty cash” ledger account. You may close both the “Dimension set rules” and “Dimension sets” forms now.
5. The validation rule is ready, but the system will not use it until we set up the final parameter: open “General ledger > Setup > Parameters” form and set “Activate sets” parameter to “At update and posting”.

Congratulations! You have just made the dimension sets feature up and running!
6. Would you like to see the effect? Then open “General ledger > Journals > General journal” form and create a new journal, then press “Lines”.
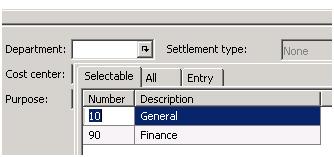
In the journal lines form, create a new line (but don’t modify any fields for now!) and press the lookup button of the Department dimension:
You can see, that the lookup form has changed – now it has 3 tabs, and the first tab “Selectable” contains all departments. Any department may be selected at this point. But don’t select any department; instead, set “Account” field of the journal line to 110180:

And press the Department lookup button again:
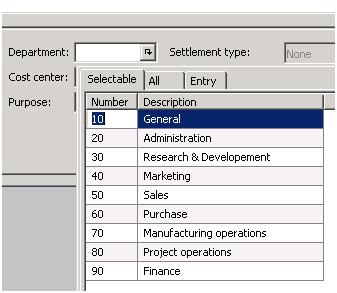
As we can see, only two departments are selectable now. Select the Finance department. The department dimension is set up. Press the lookup button of the Cost center dimension:
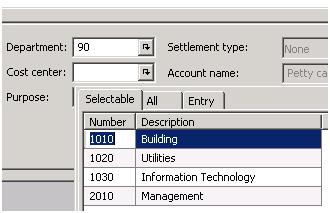
These four cost centers are indeed the only cost centers valid for Finance department. The dimension set rule works as expected! We may select one of these values, say, 1010 Building, and our Department and Cost center dimensions are set up.
By the way, if you opened the lookup form of the Purpose dimension, all purposes would be selectable, because we don’t have any dimension set rules controlling purposes.
Now, we may proceed with the journal lines edition, validation and posting.