Word のコンテンツコントロールを利用したサンプル(その3)
今回は Word のコンテンツコントロールを利用したサンプルの3回目です。
前回はデータ接続と作業ウィンドウの設定をおこないました。
今回は作業ウィンドウに配置したコントロールのデータバインドの設定をおこないたいと思います。
このデータバインドの設定ですが、基本、コードを書かずにプロパティの設定だけで、リレーションを貼ったテーブルのデータの操作をおこなうことが可能な優れものです。
.NET でデータ接続ウィザードをご利用の方はご存じの内容であるかと思うのですが、あまり使われていない方がこれを見た時に結構、驚かれます。
では、前回の続きです。
手順:
次にアクションペインに配置した[ComboBox]コントロールや[ListBox]コントロールにデータをバインドさせるコードを記述します。
44. ソリューションエクスプローラからThisDocument.vbを右クリックし、「コードの表示」を選択し、コードエディタを表示します。
45. 次のコードを記述します。

Private Sub ActionControl_Load(ByVal sender As Object, ByVal e As System.EventArgs) Handles Me.Load
Me.CustomersTableAdapter.Fill(Me.NorthwindDataSet.Customers)
Me.SuppliersTableAdapter.Fill(Me.NorthwindDataSet.Suppliers)
Me.ProductsTableAdapter.Fill(Me.NorthwindDataSet.Products )
End Sub
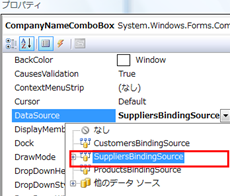
46. 次に[ActionControl]から、
[CompanyNameComboBox] コントロールを選択し、プロパティウィンドウから[DataSource]プロパティのプルダウンメニューをクリックし、
[SuppliersBindingSource]を選択します。
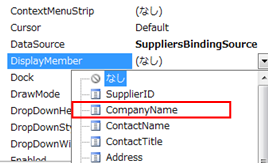
47. 次に [DisplayMember]プロパティで、[CompanyName] を選択します。
48. [DataBindings]プロパティで、[Text]プロパティを[なし]にします。

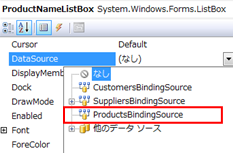
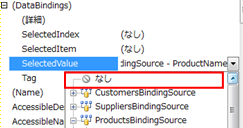
49. [ProductNameListBox] コントロールを選択し、プロパティウィンドウから[DataSource]プロパティのプルダウンメニューをクリックし、
[ProductsBindingSource]を選択します。
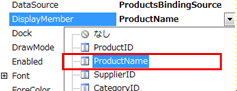
50. 次に [DisplayMember]プロパティで、[ProductsName]を選択します。
51. [DataBindings]プロパティで、[SelectedValue]プロパティを[なし]にします。
次にアクションペイン上に読み込んだ会社情報データをWordドキュメント上のコンテンツコントロールに表示するロジックを作成します。
52. 以下のコードを元に AddDataClass.vb を作成します。
Public Class AddItemClass
Public Sub AddItemText(ByVal CustomerNameTextBox As String, ByVal ContactNameTextBox As String, ByVal _
PostalCodeTextBox As String, ByVal CityTextBox As String, ByVal AddressTextBox As String, _
ByVal PhoneTextBox As String, ByVal FaxTextBox As String)
'発送先会社名
Dim CustomerNameAdd As Microsoft.Office.Tools.Word.PlainTextContentControl
CustomerNameAdd = Globals.ThisDocument.PlainTextContentControl1
CustomerNameAdd.Text = CustomerNameTextBox
'発送先担当者名
Dim ContactNameAdd As Microsoft.Office.Tools.Word.PlainTextContentControl
ContactNameAdd = Globals.ThisDocument.PlainTextContentControl2
ContactNameAdd.Text = ContactNameTextBox
'郵便番号
Dim PostalCodeAdd As Microsoft.Office.Tools.Word.PlainTextContentControl
PostalCodeAdd = Globals.ThisDocument.PlainTextContentControl3
PostalCodeAdd.Text = PostalCodeTextBox
'住所1(City)
Dim CityAdd As Microsoft.Office.Tools.Word.PlainTextContentControl
CityAdd = Globals.ThisDocument.PlainTextContentControl4
CityAdd.Text = CityTextBox
'住所2(Address)
Dim AddressAdd As Microsoft.Office.Tools.Word.PlainTextContentControl
AddressAdd = Globals.ThisDocument.PlainTextContentControl5
AddressAdd.Text = AddressTextBox
'電話番号
Dim PhoneAdd As Microsoft.Office.Tools.Word.PlainTextContentControl
PhoneAdd = Globals.ThisDocument.PlainTextContentControl6
PhoneAdd.Text = PhoneTextBox
'FAX
Dim FaxAdd As Microsoft.Office.Tools.Word.PlainTextContentControl
FaxAdd = Globals.ThisDocument.PlainTextContentControl7
FaxAdd.Text = FaxTextBox
End Sub
End Class
作成後、クラスを保存します。
※このクラスはアクションペイン上の会社情報をドキュメント上のコンテンツコントロールにマッピングさせるクラスです。
53. [ActionControl]コントロール上で[発送顧客を追加]ボタンをダブルクリックして、コードエディタを起動します。
![clip_image002[31]](https://msdntnarchive.blob.core.windows.net/media/TNBlogsFS/BlogFileStorage/blogs_msdn/saikik/WindowsLiveWriter/Word_195B/clip_image002%5B31%5D.jpg)
54. 以下のコードを記述します。

Private Sub btnCustomer_Click(ByVal sender As System.Object, ByVal e As System.EventArgs) Handles btnCustomer.Click
Dim AddItem As New AddItemClass
AddItem.AddItemText(Me.CompanyNameTextBox.Text, Me.ContactNameTextBox.Text, Me.PostalCodeTextBox.Text, _
Me.CityTextBox.Text, Me.AddressTextBox.Text, Me.PhoneTextBox.Text, Me.FaxTextBox.Text)
'テーブルの最初の位置を選択
Globals.ThisDocument.Tables.Item(4).Cell(1, 1).Select()
End Sub
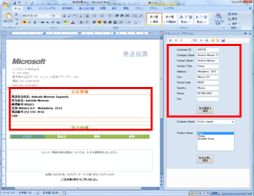
55. ここで、一旦ビルドしてデバッグします。
アクションペイン上の顧客情報が[発送顧客を追加]ボタンをクリックすることで、Word ドキュメント上のコンテンツコントロールに転記されます。
56. ソリューションエクスプローラからActionControl.vbを右クリックし、「コードの表示」を選択し、コードエディタを表示し、以下のコードを記述します。
![clip_image002[33]](https://msdntnarchive.blob.core.windows.net/media/TNBlogsFS/BlogFileStorage/blogs_msdn/saikik/WindowsLiveWriter/Word_195B/clip_image002%5B33%5D.jpg)
Private Sub AddData(ByVal row As DataRow, ByVal companyName As String)
'データを表に書き出す処理
Dim selection As Word.Selection = Globals.ThisDocument.Application.Selection
If selection.Tables.Count > 0 Then
Dim newRow As Word.Row = Globals.ThisDocument.Tables(4).Rows.Add()
With newRow
.Range.Font.Bold = False
.Range.ParagraphFormat.Alignment = Word.WdParagraphAlignment.wdAlignParagraphLeft
.Cells(4).Range.ParagraphFormat.Alignment = Word.WdParagraphAlignment.wdAlignParagraphRight
.Cells(1).Range.Text = companyName
.Cells(2).Range.Text = row.Item("ProductName").ToString
.Cells(3).Range.Text = row.Item("QuantityPerUnit").ToString
.Cells(4).Range.Text = Math.Round(row.Item("UnitPrice"), 2)
End With
Else
MessageBox.Show("カーソルをテーブルの中に入れてください。", _
"Actions Pane", MessageBoxButtons.OK, MessageBoxIcon.Error)
End If
End Sub
57.[ActionControl]コントロール上で[発送伝票に追加]ボタンをダブルクリックして、コードエディタを起動し、以下のコードを記述します。

Private Sub btnForm_Click(ByVal sender As System.Object, ByVal e As System.EventArgs) Handles btnForm.Click
Dim tbl As DataTable = NorthwindDataSet.Products
Dim rows() As DataRow
If Not Me.ProductNameListBox.SelectedIndex < 0 Then
Dim Product As String = Me.ProductNameListBox.SelectedItem.row.item("ProductName")
Dim company As String = Me.CompanyNameComboBox.Text
rows = tbl.Select("ProductName ='" & Product.Replace("'", "''") & "'")
AddData(rows(0), company)
Else
MessageBox.Show("商品を選択してください。", "ActionPane", MessageBoxButtons.OK)
End If
End Sub
End Class
58. ここで、[デバッグ開始]をクリックします。
59. [発送伝票に追加]ボタンをクリックして、商品一覧が表に追加されていけば、完成です。
ここで、Word のコンテンツコントロールを利用したサンプル(その1) で紹介した動きになるはずです。
一応、ソリューションファイルを添付しておきますので、こちらで動きを確認してみていただければと思います。