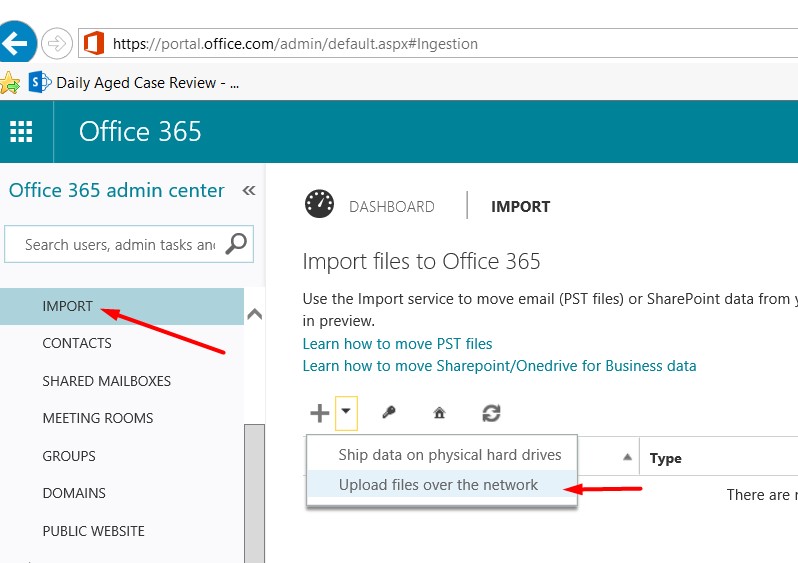
Import Service - SharePoint online
Office 365 Import Service for SPO Migration
Introduction
Hi everyone. My name is Ambarish Singh and this is my first TechNet blog. I am a Microsoft employee and I am writing this blog to help a larger audience over the use of Import service to migrate content from either file share or on an on-premise implementation of SharePoint server site to SharePoint online sites. I have attempted to provide a step by step guide for use of import service to migrate documents from a file share or from a document library hosted in an on premise SharePoint server site.
We are going to take a look at the steps that we need to take to perform migration of files/documents from your on premise fileshare or on premise SharePoint site onto a SharePoint online document library.
What you need before we start
- Supported Operating Systems: Windows 7 Service Pack 1, Windows 8, Windows Server 2008 R2 SP1, Windows Server 2008 Service Pack 2, Windows Server 2012, Windows Server 2012 R2
- PowerShell 4.0
- Download and install the SharePoint Online Management Shell MSI from this site. Use the Control Pane to uninstall any previous versions.
- Install from here: SharePoint Online Management Shell
- Open SharePoint Online Management Shell and select Run as Administrator.
- Permissions: You must be a site collection administrator on the site you are targeting.
What will we look into
- SPO Migration using a file share locally
Prepare
We are going to execute the following powershell to prepare the migration package first.
a . New-SPOMigrationPackage –SourceFilesPath (Please enter the network path or the local path to the content you want to move) -OutputPackagePath (give the local path or the network path to a blank folder where the package manifest will be generated) -TargetWebUrl (This should be the url to site/subsite on SharePoint online) -TargetDocumentLibraryPath (relative path to your document library on the SPO site)
We would need credentials to our SPO tenant site stored in a variable for use in next powershell command related to the migration. Here is what we will do as a next step
PleaseNote: If you were using an old version of SharePoint online management shell, storing your credentials in a variable wouldn’t be required. But the issue with being on old version is that most of the switches I have used below are not available.
b. $cred = get-credential
We are now going to prepare the SPO Migration Targeted package using the Package files generated above.
c. ConvertTo-SPOMigrationTargetedPackage –SourceFilesPath (please enter this the same as in step a) -SourcePackagePath (so the –outputpackage path in step a is what you will enter here) -outputPackagePath (this is the actual spomigration targeted package) -TargetWebUrl (same as in step a) -TargetDocumentLibraryPath (same as in step a) -Credentials $cred
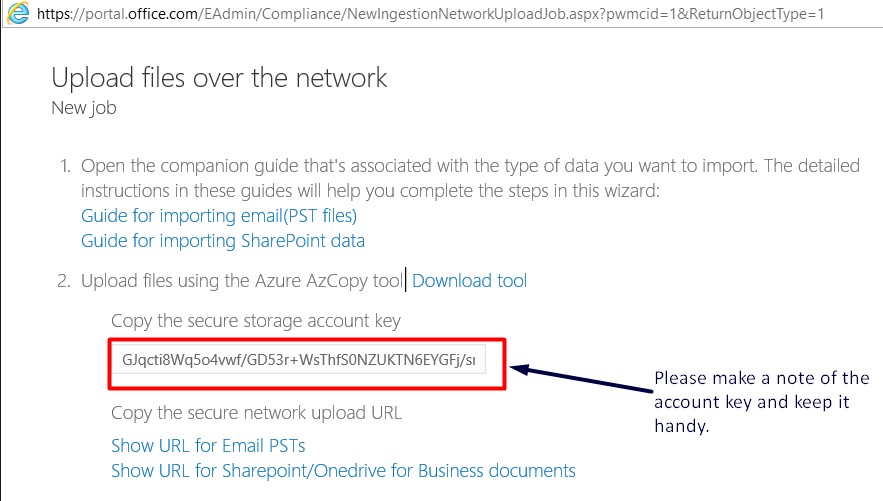
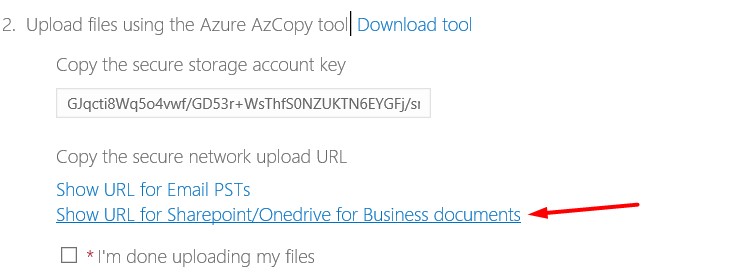
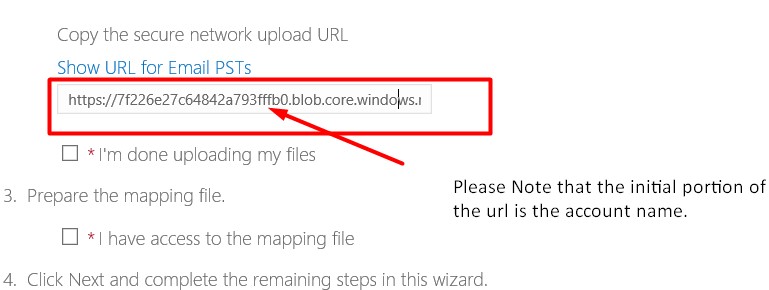
d. $azurelocations = Set-SPOMigrationPackageAzureSource -SourceFilesPath (same as step a) –SourcePackagePath (the outputpackagepath from step c should be entered here) -AccountName (this is the initial portion of the SharePoint url that we get in the upload files over the network wizard in the o365 admin center page) -AccountKey (this is generated in the upload files over the network wizard in O365 admin center page) -PackageContainerName (this is any name that you want to give. This name is to identify this migration job)
Execute
e. Submit-SPOMigrationJob -TargetWebUrl (this is web url for the target site, you should not include the library name here) -MigrationPackageAzureLocations $azurelocations -Credentials $cred
Note: Please note that some users might want to use a csv file to perform the migration from GUI. The CSV file requires following data to be entered before they can save it and upload it to the upload files over network wizard.

Please refer the TechNet article for steps to upload the csv file into the wizard after you have done the required changes to it.
Monitor
We can execute the powershell below to get the jobstatus using the guid that was generated in the step e above.
Get-SPOMigrationJobStatus -TargetWebUrl https://desertboots.sharepoint.com -Credentials $cred
Also, you can check the status of your job by viewing the real time updates posted in the Azure storage account queue. You can check the live status of the migration job by going to the azure storage explorer site .
2. SPO Migration exporting an on premise SharePoint site
Note:
We need to login to the SharePoint on premise server. For the convenience of executing all the steps on the server. I downloaded and installed SharePoint online management shell as well on the on premise server. However, remember most of the companies do not provide internet access on any server machine. In such situation you can collect the migration package from the on premise server and then execute rest of the steps on your local machine where you have SPO management shell and internet access.
Prepare
First and foremost we will download the SharePoint online management shell on the server or you might just copy the module called Microsoft.SharePoint.Online.Management on to your on premise server and then do an import-module to be able to run even the SPO commandlets from the SharePoint on premise powershell.
a. Export-SPWeb -Identity https://sharepoint2k13 -Path c:\spsitecontent\spcontent -ItemUrl "/Shared documents" –NoFileCompression
b. $cred = get-credential
c. ConvertTo-SPOMigrationTargetedPackage -SourceFilesPath C:\SPsiteContent\spcontent (same as the value of path switch in step a) -SourcePackagePath C:\SPsiteContent\spcontent (same as the value of path switch in step a) -OutputPackagePath C:\SPsiteConten\SPcontentOut (declare a new location to capture the spomigration targeted package) -TargetWebUrl https://desertboots.sharepoint.com -TargetDocumentLibraryPath "/filesfromonprem" -Credentials $cred
d.$azurelocations = Set-SPOMigrationPackageAzureSource -SourceFilesPath c:\spsitecontent\spcontent -sourcepackagepath C:\spsitecontent\spcontentout (generated from step c for outputpackagepath) -AccountName 7f226e27c64842a793fffb0 -AccountKey “GJqcti8Wq5o4vwf/GD53r+WsThfS0NZUKTN6EYGFj/sr7hcnVlHF6lN5g1InBF77XI0O/spuUmtMGiWZJsDI/A==" -PackageContainerName OnPremMigration (any name you want to identify this migration effort with)
Note: Just as an additional step here you can run the following command to list the parameters that you may need to use if you are going to use a mapping file (.csv) in the last step. Otherwise, if you are using the powershell commands only, then you don’t need this step.
$azurelocations | fl
Result of the command:
PackageContainerUri : https://7f226e27c64842a793fffb0.blob.core.windows.net/
onpremmigration?sv=2015-02-21&sr=c&sig=VPIetTb8mSa/lwT
nDMwFFcUDpn/FVeY8dK3KzrQ3n7g=&se=2016-02-20T03:28:07Z&
sp=rwl
ReportingQueueUri :
FileContainerUploadUri : https://7f226e27c64842a793fffb0.blob.core.windows.net/
82da9b8f-090d-4a8f-a069-757fc325e6db-file?sv=2015-02-2
1&sr=c&sig=cVzzmgZ4a4SgfbrzbxHm7PX/leaNm/vmBvEjNbpj9IQ
=&se=2016-02-20T03:28:06Z&sp=rw
Note: In the step above you get the value for following two columns that you will be required to fill in the .csv file if you are using the .csv file approach for migration rather than the complete powershell approach.
FileContainerUri -> SPFileContainer
PackageContainerUri - > SPManifestContainer
Execute
e. Submit-SPOMigrationJob -TargetWebUrl https://desertboots.sharepoint.com -MigrationPackageAzureLocations $azurelocations -credentials $cred
Monitor
We can execute the powershell below to get the jobstatus using the guid that was generated in the step e above.
Get-SPOMigrationJobStatus -TargetWebUrl https://desertboots.sharepoint.com -Credentials $cred
Where can we find references:
SharePoint Online and OneDrive Migration User Guide [Important] https://technet.microsoft.com/en-us/library/mt203923.aspx
Use Windows PowerShell cmdlets for SharePoint Online and OneDrive Migration https://technet.microsoft.com/library/mt143608.aspx
SharePoint Online and OneDrive for Business: software boundaries and limits https://support.office.com/en-us/article/SharePoint-Online-and-OneDrive-for-Business-software-boundaries-and-limits-8f34ff47-b749-408b-abc0-b605e1f6d498?ui=en-US&rs=en-US&ad=US