How to securely add a sender to an allow list in Office 365
Background
We sometimes see users creating allow rules, either through Exchange Transport Rules (ETRs), or Domain Allows, or Safe Senders, when they want to receive email from senders. However, they frequently do this insecurely; spammers then spoof the sending domain (or even the full email address) which skips all spam filtering and the message lands in a user's inbox. This causes significant user-dissatisfaction.
Or, on the flip side, organizations sometimes want to receive email from a particular sender (either their own domain, or an external one) and messages go to Junk because it's (legitimately) flagged as spam by our filters. This can occur a couple of ways:
1. The sender is spoofing (usually your own domain) and being marked as spam/phish
This occurs when you have some service, such as an on-premise mail server or a cloud service like AWS or Azure, send automated reports to yourself. These frequently get marked as spam and have the red fraud detection tip on them.
2. The sender is being flagged as spam because of bulk email filtering
It's common to send bulk email, such as marketing or transactional messages, through a bulk email service like MailChimp, SalesForce, SendGrid, SparkPost, SailThru, etc. These bulk email services often have the option for customers to send email through dedicated IPs, but they more frequently have customers send through shared IP pools. These bulk IPs are assigned a Bulk Confidence Level (BCL); because they come from shared IPs, some IPs have a high (more spammy) BCL and therefore get marked as spam. The net result is that the bulk email service you subscribe to can't send email to yourself (for more details, see Bulk Complaint Level values.)
This article describes how to fix this.
The wrong way to allow a sender domain
One of the most common methods to allow a sending domain is through ETRs. However, the most insecure way to do it is to create one that looks at the sending domain, and if it matches, sets SCL -1:
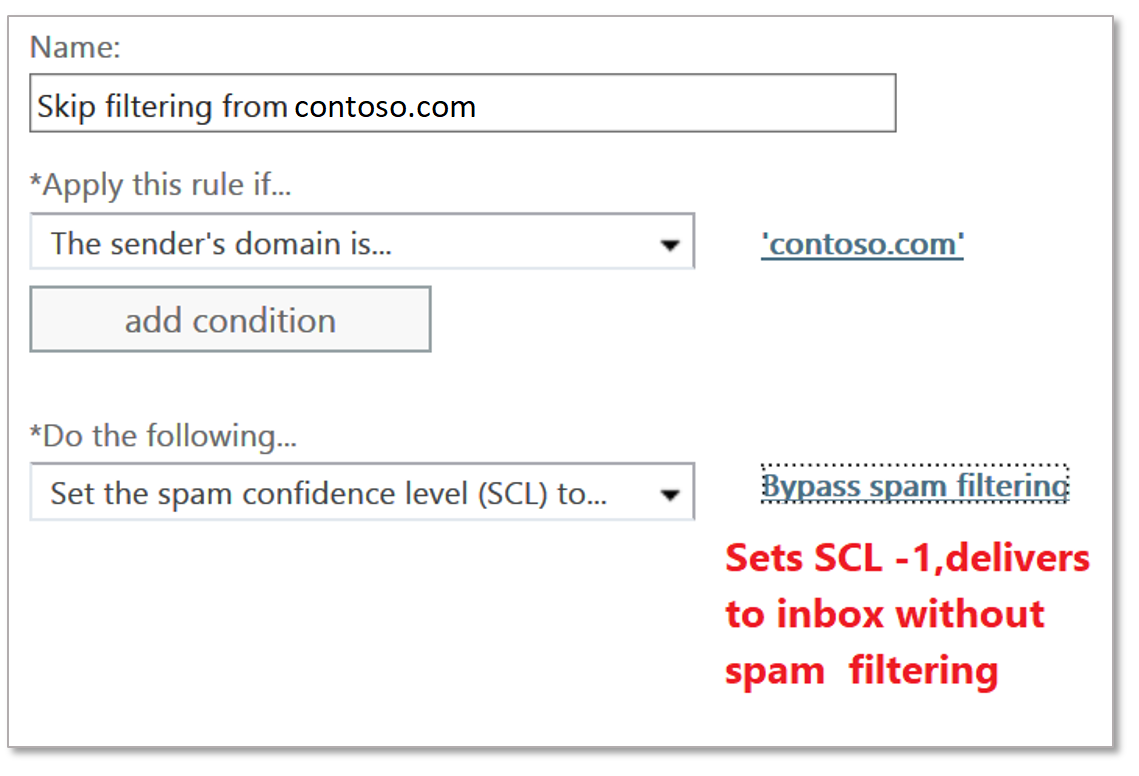
This is the least secure ETR you could possibly write. What happens is the email hits the Transport Rule engine, and then does a string match on the domain in the From: address. If it matches, it skips spam filtering and delivers to the Inbox.
This is insecure because it's trivially easy for a spammer or phisher to put anything they want into the From: address. So while you think you're allowing email from the sender, you're actually allowing email from anyone who puts that particular domain in the From: address. Because of the volume of spear-phishing attacks that is so prevalent today, it's fairly easy to guess whose sending you email legitimately that you might want to allow. Common examples are members of an organization's senior leadership team like the CEO, CFO, etc. Other guessable examples are companies you do business with. A large energy company probably talks to other large energy companies and its suppliers. A large (or medium, or small) technology company probably talks to other large (or medium, or small) technology companies. You maybe even have your own domain allowed so you get all sorts of external reports.
These are all easily guessable by spammers and phishers.
The secure way to allow a domain to send you email
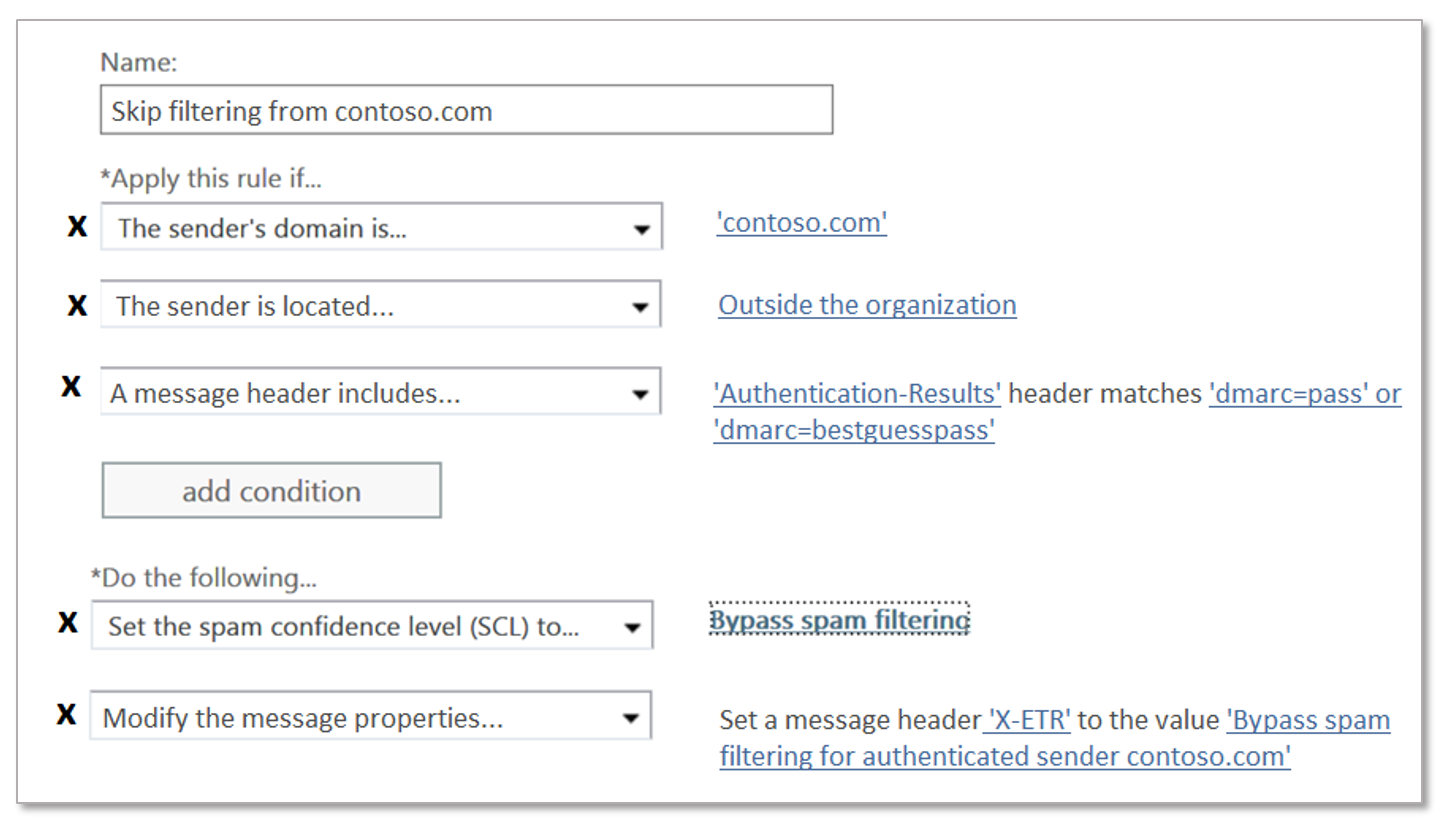
The best way to create an ETR is to do it securely. You should allow a domain + something else:
- Use the sending domain plus authentication status. You can put the sending domain as one condition, and then the Authentication-Results header contains "dmarc=pass" or "dmarc=bestguesspass". This ensures that the sending domain has been authenticated and is not spoofing. The advantage of doing it this way is if you want to add more domains, you can simply add to the list of domains
- Or, if the sending domain does not authenticate, use the sending domain plus a sending IP (or IP range). However, be restrictive in the amount of IPs you add, we recommend going no wider than a /24. If you go wider than that, you may be allowing too many sending infrastructures that is not under control of the sender
- Optionally, add a condition that the message originates from outside the organization (this is implicit, but it's fine to add it as a condition to account for on-premise servers that may not be configured correctly)
The rule actions should be the following:
- Set the SCL to -1 (Bypass spam filtering)
- Add an x-header that says what the rule does. In the example below, I've added a simple header "X-ETR: Bypass spam filtering for authenticated sender contoso.com". If you have more than one domain in this rule, you can change the header text as appropriate.When a message skips filtering due to an ETR, it stamps SFV:SKN in the X-Forefront-Antispam-Report header (if it's on an IP Allow list, it also stamps IPV:CAL). However, there's no way to see if the ETR was secure or not without manually unwinding everything and viewing the ETR syntax. That's why it is important to add the additional header so you can figure what's going on in the event that you ever get a spam message that skipped filtering.
You should only include domains that are under the control of the sending organization, that is, don't add free consumer accounts like @gmail.com, @outlook.com, etc. If you want to add a free consumer account, add the entire email address.
What about Domain Allows, and Sender Allows?
There's another way to bypass filtering, and that's by adding a Domain Allow, or Sender Allow (full email address).
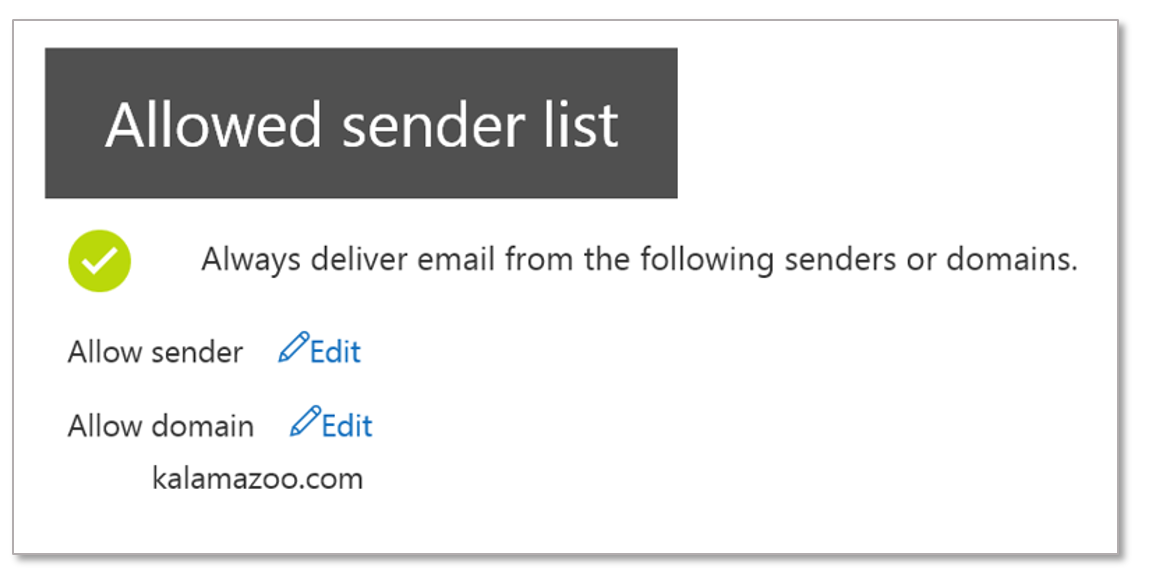
The problem with Domain Allows as currently implemented by Office 365 is that they are simple string matches, similar to insecure ETRs. You should only use them when you want to allow a particular sender that is not easily guessable, e.g., noreply-alerts@contoso.com (although even that is somewhat guessable).
When a message skips filtering due to a Domain Allow or Sender Allow, it stamps SFV:SKA in the X-Forefront-Antispam-Report header.
You shouldn't use these to add your own domain, or when the sending domain has no authentication, or when the sending domain is a free consumer email service. This is because the first two are easily spoofable, and the third one doesn't have enough sign-up roadblocks to prevent phishing.
The good news is that we are fixing the problem of authentication and spoofing with Domain Allows - if a message fails authentication, we will not respect the Domain or Sender Allow and instead send it through regular filtering. Until then, probably the best advice is to avoid this feature to allow sending domains unless you're really, really confident a spammer would not spoof it.
What about Safe Senders?
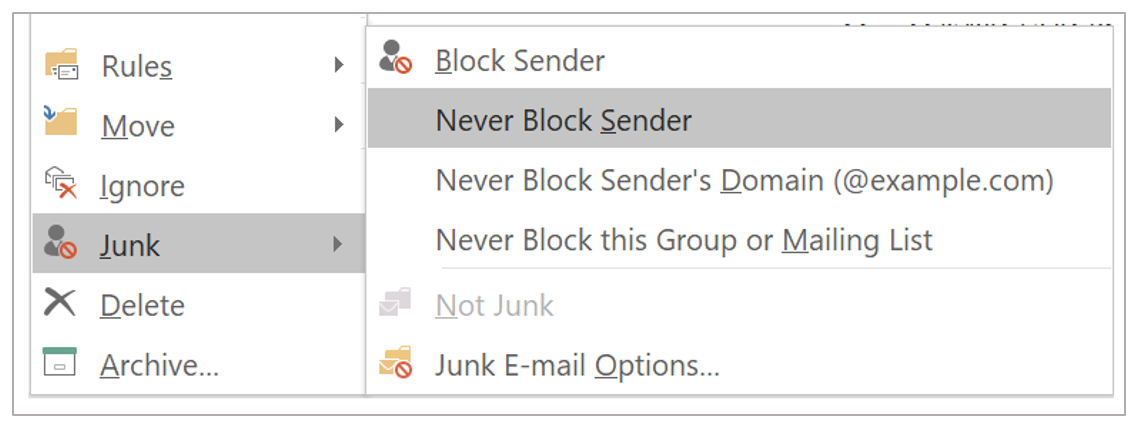
Safe senders are user-actions that your users can take to skip filtering from senders that are ending up in Junk (or they do it proactively to prevent the filter from ever doing it). Rather than get into the full details, please see How to set up safe senders and blocked senders in Office 365.
It is difficult to prevent your users from using Safe Senders, they are a valuable feature. However, as currently implemented by Office 365, they are vulnerable to spoofing because they are simple string matches. Fortunately, as per above, we are making a change to not respect a user's safe sender if it fails authentication. Our recommendation is for users to add to safe senders when they want to receive email from someone specific.
When a message skips filtering due to a user safe sender, it stamps SFV:SFE in the X-Forefront-Antispam-Report header.
Be aware that it's fairly common for executives in organizations to safe sender each other, and spammers/phishers guess this and send malicious email which skips filtering.
The option "Never block Sender's Domain (@example.com)" is never respected in Office 365. It is a no-operation.
Making sure your domain is secure... or at least, authenticating so you can securely allow it to bypass filtering
Okay, by now you've understood why you should only permit secure domains to skip filtering when sending into your organization (unless you know what you're doing and want to take a calculated risk). The next question is: How do I ensure my domain is secure?
- First, if you're sending outbound email through Office 365, make sure you've set up SPF and DKIM so that it passes authentication when email originates outside of the service.
. How Office 365 uses Sender Policy Framework (SPF) to prevent spoofing Use DKIM to validate outbound email sent from your custom domain in Office 365asdfasdf
.asdfas. - Second, for each service you use that sends outbound email as your domain, make sure you add it either to your SPF record, or set up DKIM so that it signs as your domain.There is lots and lots of documentation on the Internet about how to go about doing this, and the best way to inventory them is to use DMARC (for example, see How we got to enforce DMARC for sub-domains of Microsoft’s largest consumer email brands and How we moved microsoft.com to a p=quarantine DMARC record).
.
However, there are a handful of large senders that a lot of large organizations use. Here's a quick list of their documentation on how to set up SPF and/or DKIM on them:
.
SalesForce
SPF - What SPF records do I need to add to my domain for Salesforce?
DKIM - DKIM Signing Outbound Email, Set up DKIM in SalesForce classic
.
SparkPost
SPF - Sparkpost SPF builder
DKIM - Sparkpost: DKIM explained
.
SendGrid
SPF - SPF: Sendgrid documentation
DKIM - DKIM: Sendgrid documentation
.
MailChimp
SPF and DKIM - Set Up Custom Domain Authentication: DKIM and SPF
.
SailThru
SPF and DKIM - Configure DNS records for your domain
.
This list is not meant to be exhaustive. If I haven't listed the service here, you can easily find it yourself by doing a search for "Set up SPF <service>" or "Set up DKIM <service>".
By setting up authentication, you can send email to yourself (or anyone else) and have it authenticate as your domain, and then it's safe to add to a domain allow list. However, you must do this for each service you send out of, otherwise if you don't, it will go through the regular spam filtering stack where it may get marked as spam.
Conclusion
We understand the need to sometimes bypass spam filtering; sometimes filters make mistake and legitimate email gets marked as spam. However, you need to do it securely so you don't accidentally allow spam/phish/malware into your organization.
We're making updates to the system so that we do the right thing even without you - as an administrator - having to specifically set it up. However, there will always be a place for admins to make some overrides.
This post should help you do it.
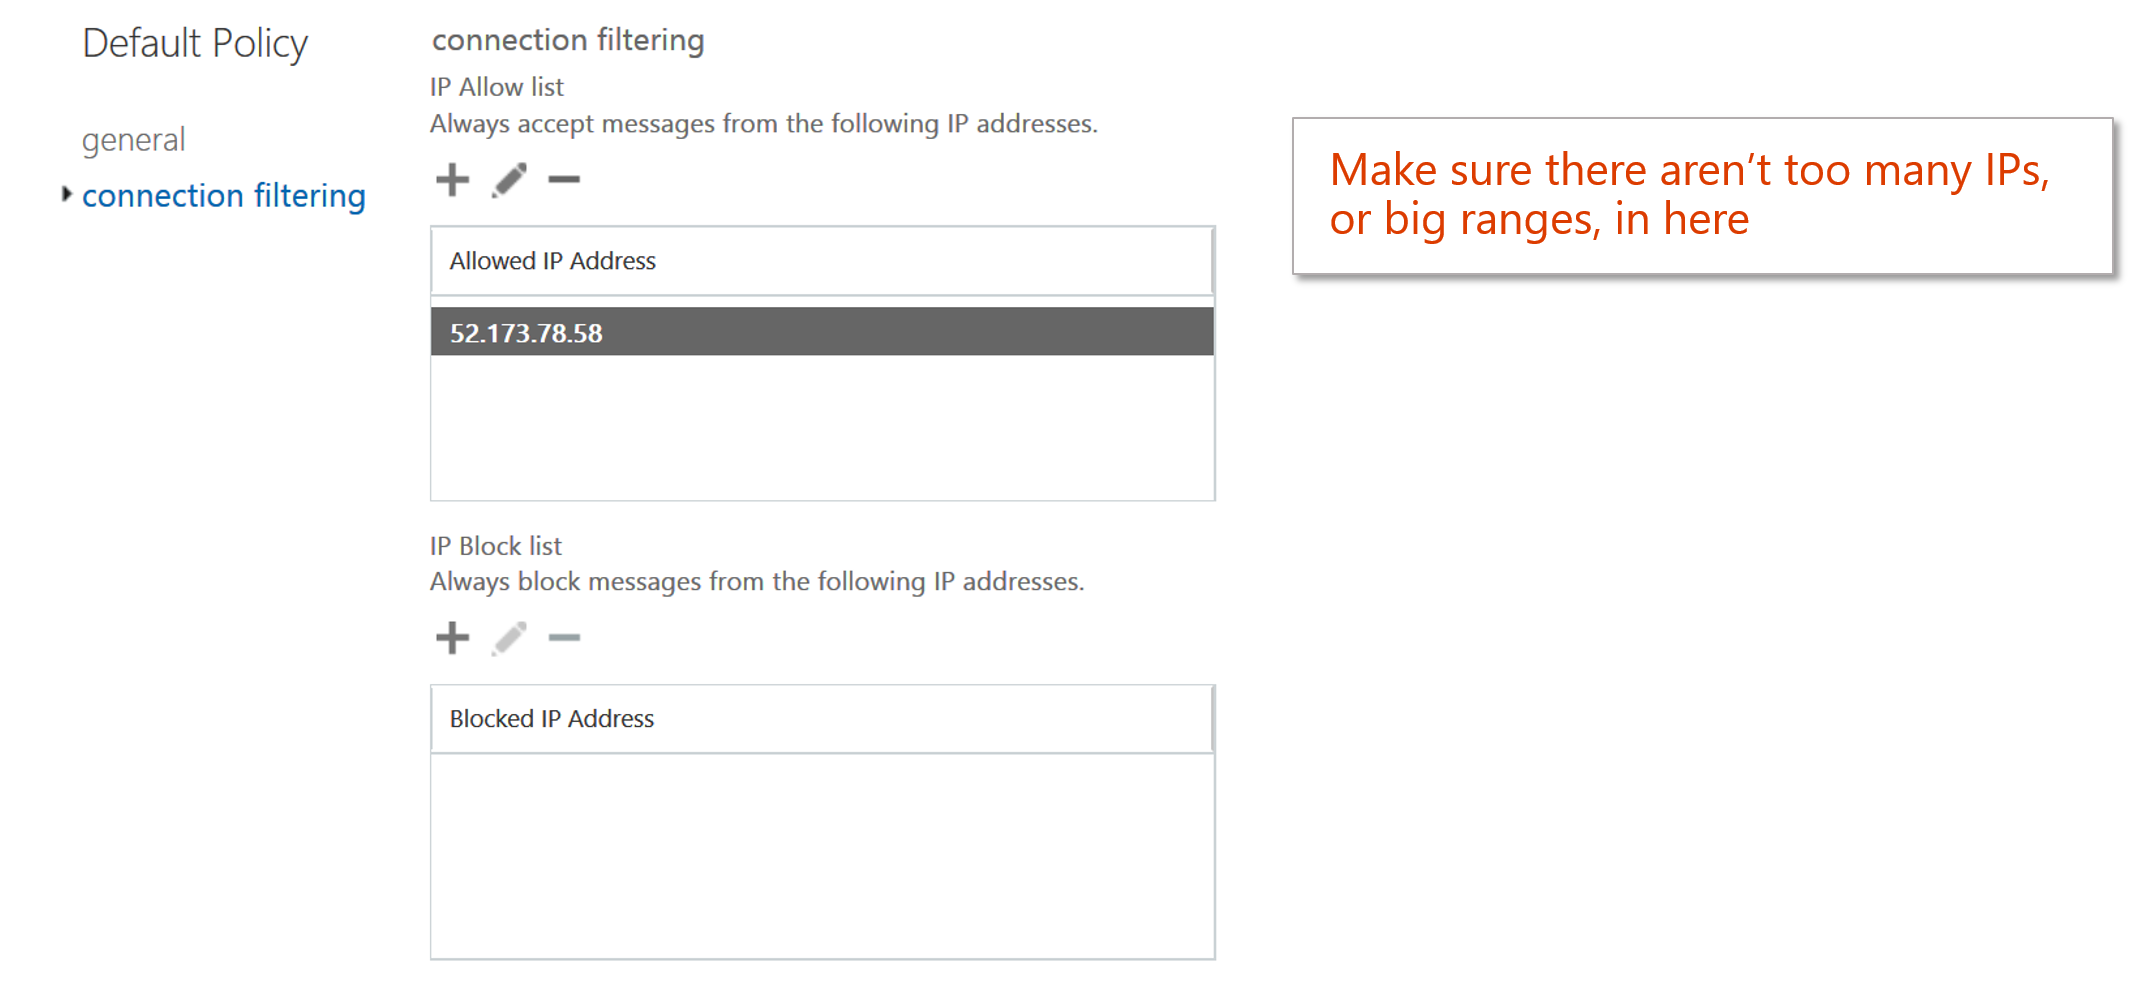
Appendix - IP Allows
There is another way to skip filtering in Office 365 and that's by setting up an IP Allow. There are advantages and disadvantages.
On the plus side, they are easy to add. You just navigate through the UX (or use Powershell), and add a sending IP and it then skips all spam filtering (malware filtering is still applied). No fancy ETR syntax required.
However, one drawback is that they are hard to manage. Whereas it's pretty easy to see what a domain is (e.g., microsoft.com is Microsoft, google.com is Google), it's difficult to look at an IP and see what it is without doing a reverse DNS lookup or a WHOIS lookup. "Just what was I thinking when I added 1.2.3.4 to my IP Allow?"
A second drawback of IP allows is that you don't always know who sends the IP. Is it the one sender who you got a false positive from? Or is it shared IP space (such as a bulk email provider, or even Office 365)? That is, will adding an IP Allow skip filtering from many different senders, most of whom you didn't intend? Before adding it, you should verify whether the IP belongs to a single domain, or many. If you don't know how to do that, use an ETR per above and allow the sending domain securely.
A third drawback of IP allows, related to the second drawback, is that you may add too many IPs. For example, if you add an entire /24 range, you may not know the ownership of that entire range. For many administrators who aren't technical enough to look up WHOIS records and interpret CIDR notation, this may end up permitting more than you thought.
So, exercise caution when using this feature.