Moving IPAM Database from Windows Internal Database (WID) to SQL server located on the same server
One of the new feature of the IPAM role in Windows Server 2012 R2 is external database support. There are common scenarios that may require you to move the IPAM database to SQL server instance. Such as...
- Database size constraints (limitations of WID)
- Availability constraints
Requirements
- Local admin rights
- Enterprise edition of the SQL server not earlier than SQL 2008 R2
Check current configuration of the Database
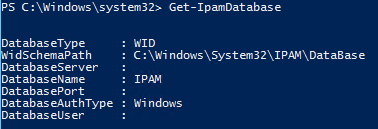
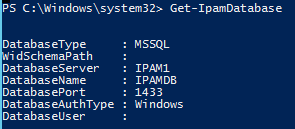
Before you start moving the database from WID to SQL, run Get-IpamDatabase powershell cmdlet to check the current configuration.
Creating new database and assign the required permissions
Since the IPAM service is running as "NT AUTHORITY\NETWORK SERVICE", this account has to be configured with the below required permissions in the database configuration otherwise if you are not Planning to su SQL authentication. In order to overcome this requirement create login new login with the default configuration as followed.
- Membership to db_datareader, db_datawriter, db_ddladmin roles and "Alter database" & "view database state" permissions are required on the database
Open SQL Management Studio, right click logins and create new login "NT AUTHORITY\NETWORK SERVICE"

Right click the Databases, click New Database and create new IPAM Database

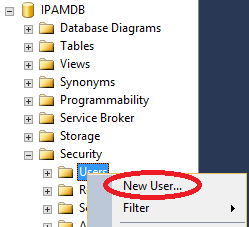
Once you have IPAM Database created, expand new database and then expand security, right click the Users and hit the New User
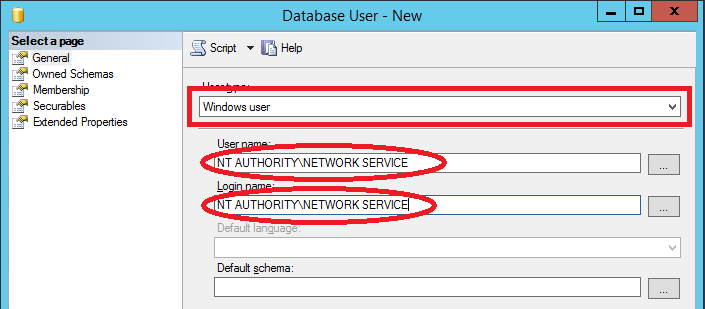
In the "Database User - New" window select user type to Windows user and type "NT AUTHORITY\NETWORK SERVICE" to User name and Login name fields.
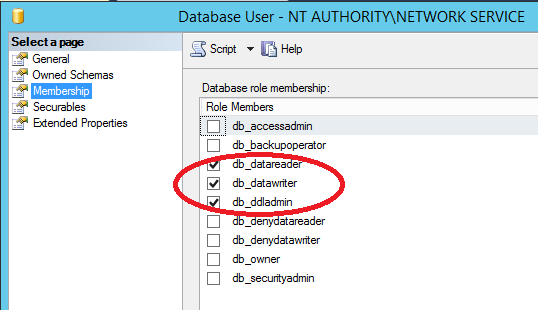
Once the user created, open the properties of the "NT AUTHORITY\NETWORK SERVICE", in the "Database User - NT AUTHORITY\NETWORK SERVICE" window, select membership and assign db_datareader, db_datawriter, db_ddladmin roles as shown below
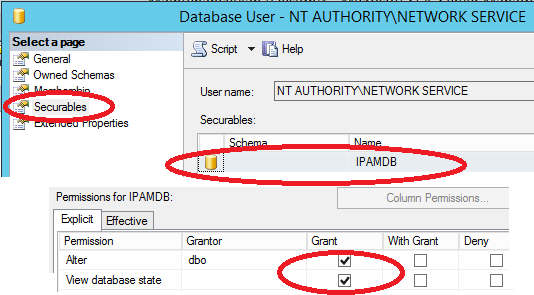
In the same window, select securables and grant "Alter database" & "view database state" permissions to "NT AUTHORITY\NETWORK SERVICE"
Moving the Database
Now database is ready to move after the required database permissions are set. Run the following PowerShell command to move the database from WID to SQL.
Move-IpamDatabase -DatabaseServer <ServerName> -DatabaseName <DatabaseName> -DatabasePort <SQL ServerPort, default 1433> -DatabaseAuthType Windows
Example:
Move-IpamDatabase -DatabaseServer IPAM1 -DatabaseName IPAMDB -DatabasePort 1433 -DatabaseAuthType Windows
Note that this is a one-way operation once the database moved to SQL, cannot be reverted back to WID but off course can be moved to another SQL instance.
Verify the database configuration
Run Get-IpamDatabase powershell cmdlet to verify that the database configuration information now show that the database is running on SQL server.
Automating the database creation and permissions assignments
Optionnally following SQL script can used to simplify the process.
USE [master]
CREATE DATABASE [IPAMDB]
GO
CREATE LOGIN [NT AUTHORITY\NETWORK SERVICE] FROM WINDOWS
GO
USE [IPAMDB]
CREATE USER [NT AUTHORITY\NETWORK SERVICE] FOR LOGIN [NT AUTHORITY\NETWORK SERVICE]
GO
ALTER ROLE [db_ddladmin] ADD MEMBER [NT AUTHORITY\NETWORK SERVICE]
ALTER ROLE [db_datareader] ADD MEMBER [NT AUTHORITY\NETWORK SERVICE]
ALTER ROLE [db_datawriter] ADD MEMBER [NT AUTHORITY\NETWORK SERVICE]
GRANT ALTER TO [NT AUTHORITY\NETWORK SERVICE] AS [dbo]
GRANT VIEW DATABASE STATE TO [NT AUTHORITY\NETWORK SERVICE] AS [dbo]
GO
Run backups on regular basis however database recovery model can be set to simple if no database "point in time recovery" is required for IPAM database.
ALTER DATABASE [IPAMDB] SET RECOVERY SIMPLE
GO
Hope it helps!