The SharePoint Federation Authentication Module (SPFAM)
SharePoint Claims Authentication Series
01 - SharePoint, Claims, WS-* and the Windows Identity Foundation (WIF)
02 - WS-Federation Authentication Module and SharePoint Extensions
03 - The SharePoint Federation Authentication Module
04 - Integrating SharePoint with Windows Azure Active Directory (ACS)
05 - Session Authentication Module and WS-SecureConversation
06 - SharePoint Session Authentication Module
07 - Windows Claims Authentication
08 - Service (ActAs) Tokens
Thank you to Steve Peschka for reviewing these articles!
SharePoint Claims Authentication Part 3
Cool as WIF is, this series is meant to help with understanding SharePoint authentication in particular. So in this article we will build on the foundation laid in the first two and describe how the SharePoint Federation Authentication Module complements and extends WIF's WSFAM.
For the sake of being complete, I'll mention here that the first thing the SPFAM does is hook up SharePoint's custom certificate validation process, so that root certificates are checked against the collection stored in SharePoint in addition to the local machine store. SharePoint has its own built-in Certificate Authority; you can retrieve a list of trusted root certificates via Get-SPTrustedRootAuthority and add new ones with Add-SPTrustedRootAuthority.
Moving on, the two points where SPFAM diverges significantly from its WSFAM roots are: 1) in the process of initial redirection of the web browser when it first contacts a SharePoint web application; and 2) in the process of setting up the Session Security Token after authentication has completed in the second communication between browser and web application (after the browser is redirected back to the application). We'll focus in this article on how SharePoint handles initial redirection to an STS and return to session tokens later. It is important to emphasize that if Windows Claims and only Windows Claims is enabled for a Web Application, a different process is followed which we will cover later in its own article.
First Redirections
Assuming Windows Claims is not enabled, SharePoint starts by causing two sequential redirections to take place. As with all the interactions described above and below, you can follow along at home in Fiddler. The first two redirections are to:
- /_layouts/Authenticate.aspx
- /_login/default.aspx
The redirection to Authenticate.aspx leads to a page which tries one last time to authenticate the incoming user. I'm not sure why this is here, but perhaps we'll figure it out as we continue or perhaps a reader will know and tip us off. I believe it may help with authentication on the return trip, where our browser will visit this page again. The second redirection is initiatied by the FormsAuthenticationModule based on the following entry in web.config:
<authentication mode="Forms">
<forms loginUrl="/_login/default.aspx" />
</authentication>
Home Realm Discovery
At /_login/default.aspx the fun continues! This page is known as the MultiLogonPage and is responsible for a process called Home Realm discovery. We've referred to the URL of the SharePoint (or other) web application as the Trusting Realm. A user's Home Realm is the realm and associated STS which have first-hand knowledge of the user and are willing and capable of ascertaining and attesting to the user's identity. For example, as a Microsoft employee my home realm is generally microsoft.com. Determining a user's home realm is not always a trivial process and unfortunately sometimes requires direct user interaction. That is the case in SharePoint if more than one authentication provider has been specified for a Web Application, and is the purpose of the MultiLogon page. If more than one authentication provider has been configured, the user will be presented here with a drop-down box from which to choose their home realm - the realm which is capable of authenticating him or her.
As an aside, other options have been proposed for home realm discovery in SharePoint, such as those documented by Steve Peschka here and here and Chris Keyser here.
Luckily, in situations where only one authentication provider has been configured, the MultiLogonPage is smart enough to continue the process of sending the user to the proper STS without having to bother them further. In either case (that is, whether the STS is determined automatically or the user chooses a realm and associated STS from the dropdown), the next step is to redirect the user to the AuthenticationRedirectionUrl associated with that STS. To review these redirection URLs, you can run Get-SPAuthenticationProvider in PowerShell and check the AuthenticationRedirectionUrl property. As you will see, this next redirection is again within the SharePoint application and is the last one before we leave for our STS. In a Web Application of mine configured with a single authentication provider, here's the output of that command and the next step in our journey:
PS:> Get-SPAuthenticationProvider -WebApplication https://intranet.gavant.local -Zone Default
DisplayName : AzureACS
LoginProviderName : AzureACS
ClaimProviderName :
AuthenticationRedirectionUrl : /_trust/default.aspx?trust=AzureACS
UpgradedPersistedProperties :
And yes, before all is said and done we will walk through federating a SharePoint web application with Azure ACS. Let's explore what happens in this step. The page (_trust/default.aspx) and it's web.config are stored at 14\TEMPLATE\IDENTITYMODEL\TRUST.
Off to the STS
The key logic on this page checks the "trust" parameter of the incoming query string and prepares to finally redirect the browser to the actual STS associated with the named Trusted Provider. Note that the name of my Trusted Provider is AzureACS. If I run Get-SPTrustedIdentityTokenIssuer, I retrieve all information needed to send a WS-Federation request to that trusted provider, as shown here:
PS:> Get-SPTrustedIdentityTokenIssuer
ProviderUri : https://joshgav.accesscontrol.windows.net/v2/wsfederation
DefaultProviderRealm : https://intranet.gavant.local
ProviderRealms : {}
ClaimTypes : {https://schemas.xmlsoap.org/ws/2005/05/identity/claims/nameidentifier, https://schemas.microsoft.com/accesscontrolservice/2010/07/claims/IdentityProvider}
HasClaimTypeInformation : True
ClaimTypeInformation : {ACSNameIdentifier, ACSIdentityProvider}
IdentityClaimTypeInformation : Microsoft.SharePoint.Administration.Claims.SPTrustedClaimTypeInformation
ClaimProviderName :
UseWReplyParameter : False
Description : AzureACS
SigningCertificate : [Subject]
CN=joshgav.accesscontrol.windows.net
[Issuer]
CN=joshgav-ca, DC=joshgav, DC=com
[Serial Number]
2F3422D100000000000A
[Not Before]
3/28/2012 10:59:41 AM
[Not After]
3/28/2014 10:59:41 AM
[Thumbprint]
F8EA661189C2B1B6098B44EEB9427B2969A4FA23
Name : AzureACS
TypeName : Microsoft.SharePoint.Administration.Claims.SPTrustedLoginProvider
DisplayName : AzureACS
Id : 24c187f3-22cb-4bb9-a45c-fc31a786a1ad
Status : Online
Parent : SPSecurityTokenServiceManager Name=SecurityTokenServiceManager
Version : 3381307
Properties : {}
Farm : SPFarm Name=SPS2010RTM_SharePoint_Configuration_Database
UpgradedPersistedProperties : {}
And using this information, that's exactly what is done! This info is built into the proper WS-Federation URL with query string and my browser is redirected to the appropriate STS where the next stage in the WS-Federation profile can take place. After that is complete, the RSTR is posted back to this same location (/_trust/) and the AuthenticateRequest stage of the standard WSFAM is invoked as described before to complete the authentication process. The full sequence of HTTP requests (copied from Fiddler) is shown here (click for a larger view):
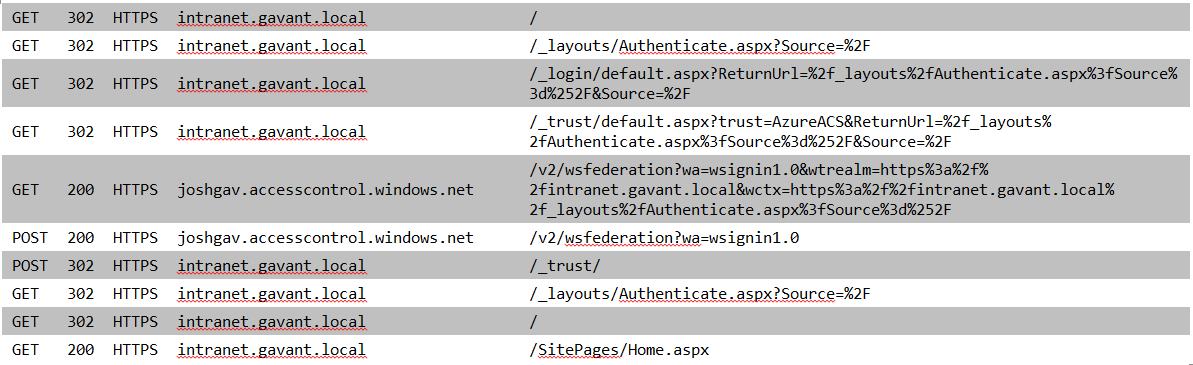
Note that in the two messages where a 200 is received followed by a POST in the next message, most details have been included in a form which is posted to the next hop. In the other GET requests information is sent to the next hop in the query string.
Conclusion
Congratulations! If you've come this far you are pretty well equipped to understand the Claims logon process in a SharePoint web application. There is still quite a ways to go, as we have yet to discuss Session and Security Context Tokens, the special case of Windows claims, and how claims works for service applications, but there is always another day J. In my next post, we'll take time for some fun practical application and I'll walk you through federating a SharePoint web application with Azure Access Control Service with the usual commentary along the way. As a bonus, we'll do it completely via PowerShell. In the meantime, rest your head!