Building accessible Windows Universal apps: Keyboard accessibility
This series of posts describes how to avoid some common accessibility bugs when building Windows Universal apps. This post focuses on bugs which affect customers who use the keyboard.
Introduction
We’ve all seen it in the movies – the hotshot hacker is at the keyboard, with only thirty seconds to complete the mission. With hands whizzing over the keyboard, success is realized with only one second to spare. And we can breathe again.
Have you ever noticed how the hacker never once paused during this, and then (i) reached over for a mouse, (ii) scrutinized their device to use a trackpad, (iii) reached out to prod something on the screen with a finger? To have done this would have cost valuable seconds, and who knows where the mission would be then. Instead the hacker just kept using the keyboard with fingers ablur – because using the keyboard is efficient. At least it is in a quality app.
What’s more, some of your customers find it a challenge to use input devices other than a keyboard, or cannot use them at all. Your customers might have tremors in their hands, and find it impractical to hit the intended UI target with a mouse or touch. Other customers with more limited mobility may use a mouth stick or head wand to type on a keyboard. And yet other customers may use a switch device or sip and puff device to interact with an on-screen keyboard which simulates physical keyboard input.
And then there’s your customers who are blind or have low vision, for whom it’s not practical to track the mouse cursor visuals on the screen. Instead they use a keyboard to navigate and control your app’s UI.
You have lots of customers who only want to use a keyboard as the input device when interacting with your UI, and it’s exciting to put thought into how best to serve these customers.
Did you know…
For many years Windows has shipped with a number of features aimed at helping customers who find using the keyboard a challenge. Take a look at such things as “Filter keys” and “Sticky keys” in the Ease of Access settings. These don’t impact what you as an app dev does when building the app, but it’s interesting to learn about the features in Windows which help your customers interact with your app.
And on a side-note - while you’re checking out some of these keyboard features, take a look at the mouse-related ones in the Control Panel too. Did you know you can change the rate at which two mouse clicks are considered to be a double-click?
A quick note on “keyboard focus”
Before talking about what “keyboard accessibility” is, I need to describe what “keyboard focus” is.
Using some input devices is a two-step process. First you let Windows know what element you’re interested in, and then you perform some action on the element. For example, when using a mouse, you first move the mouse cursor over to the element of interest, and then you press the left or right mouse button to interact with the element. You perform similar steps with the keyboard. You first move “keyboard focus” to the element that you want to interact with, and then you press some key to interact with the element. For example, you might use the Enter key to invoke a list item, or the Spacebar to select it.
At any given moment, only one element in your UI can have keyboard focus, and when it has keyboard focus that element is the target of keyboard input.
Typically a press of the Tab key will move keyboard focus from one element to the next, (and Shift+Tab will move it backwards). When moving through a list of items, a press of the Arrow keys will typically move focus between the list items.
Ok, so what is “Keyboard accessibility”?
Keyboard accessibility allows a customer who only uses the keyboard as their input device, to access all the great functionality in your app, in an efficient way. They are not blocked from anything your app has to offer due to the app requiring touch, a mouse, or some other input device to be used.
The demo app that I built to accompany this series of posts spotlights three bugs relating to keyboard accessibility. I hit those three bugs when I reviewed an app a few months ago, and it’s worth spotlighting those. The bugs were:
- A button could not get keyboard focus.
- A button did not let the customer know that it had keyboard focus.
- A button could not be controlled via the keyboard, even when it did have keyboard focus.
I’ll discuss those bugs more below, but some other things you’ll want to watch out for include:
1. Keyboard focus can move to an element that has no visuals on the screen. I also hit this one when reviewing that app a while ago. The dev had deliberately added an invisible button for some debugging purpose, but hadn’t realized that a customer using the keyboard could move keyboard focus to it and try to interact with it.
2. Keyboard focus gets stuck on an element, and your customer can’t use the keyboard to move keyboard focus to another element.
3. An app claims to be keyboard accessible, but in practice, no-one would ever really want to use the app only with the keyboard.
Point 3 above is an interesting one. Someone might say “Sure, my app’s keyboard accessible”, but what they don’t mention is that to get keyboard focus to some element takes (say) 50 presses of the tab key. Or that as the tab key is repeatedly pressed, keyboard focus moves back and forth across the screen like a tennis ball at the Wimbledon final. If the app UX makes using the keyboard really unpleasant, then it might as well be keyboard inaccessible. So do consider the path that keyboard focus takes as it moves through the app, and make it easy for your customer to follow.
And if you have many focusable elements, don’t force your customer to have to tab through them all to get to the functionality they need. Instead add keyboard shortcuts. Keyboard shortcuts are great, (or at least they’re great when the customer knows about them). A few years ago I wanted to find out for myself how keyboard accessible the products I was using at work were. So I unplugged my mouse for nine months and only used the keyboard. This experience took some getting used to, but I found that when the keyboard was my only input device, I could successfully use all the shipping products that I use at work. Learning some keyboard shortcuts during this time made all the difference. I still use Ctrl+1 and Ctrl+2 today to switch between my inbox and calendar in Outlook, because it’s more efficient for me to do that compared to grabbing a mouse, or pressing some mix of F6/Tab/Arrow/Enter to change the view.
So consider how keyboard shortcuts in your app could help your customers. If you have search functionality in your app, maybe your customer could press (say) Ctrl+F to begin a search regardless of where they happen to be working in the app.
Two fantastic test tools
When I work to make my app keyboard accessible, there are two tools that I find essential.
The first is called “the keyboard”. If you’re able to use a keyboard, try using your app only with the keyboard, with absolutely no grabbing of the mouse or trackpad, or prodding the screen with a finger. It may be tempting while testing your app to quickly click or tap a button because there doesn’t seem to be a way to reach it with the keyboard, but that single action might be a deal-breaker for your customer even if everything else in your app is perfectly accessible through the keyboard. I find it helps to unplug my mouse if I’m testing my app at the desktop.
I can’t stress the importance of testing your app using only the keyboard. It really can be illuminating.
The second test tool I use is the Inspect SDK tool. This tool can take some getting used to, but once you’re familiar with it, it can be invaluable. It can show you where keyboard focus is, even if the app UI makes it difficult or impossible to know.
For example, while keyboard focus feedback is technically present in the app screenshot below, it’s too subtle for me to find it quickly. I don’t want to have to scrutinize the app to find where I’m at.
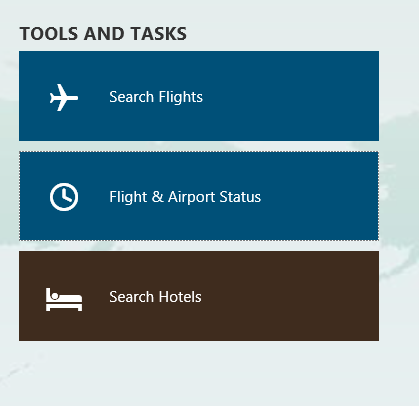
Figure 1: Subtle keyboard focus feedback appearing on the middle of three buttons.
The Inspect tool can make it really quick for me to know where keyboard focus is at any given moment in an app.
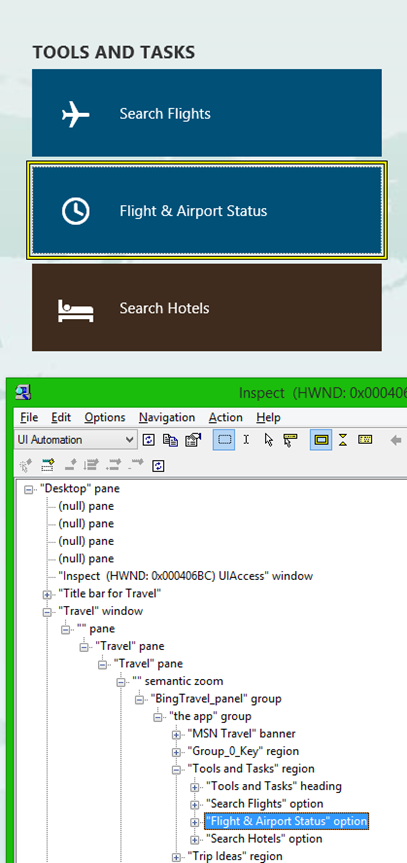
Figure 2: The Inspect SDK tool highlighting which element has keyboard focus.
The demo app
The following three points are spotlighted by my new demo app, specifically because I hit these issues when reviewing an app recently.
1. Let your customer move keyboard focus to the element that they want to interact with.
2. Let your customer know which element has keyboard focus.
3. Let your customer interact with the element once it has keyboard focus.
The image below shows the keyboard-related page of the demo app.
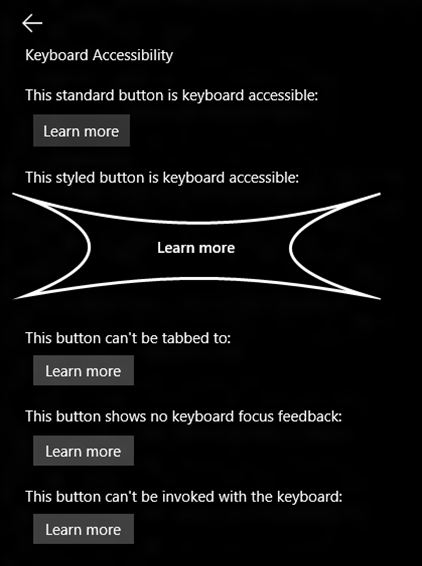
Figure 3: The Keyboard accessibility page of the demo app.
On the page there are four elements that look like buttons. Only one of those button-like elements is actually keyboard accessible. That button is a standard Button control, and the XAML framework is doing all the work for me to make it keyboard accessible.
The only additional work I did relating to that button was to explicitly set keyboard focus to the button when the page is loaded, by calling the Focus() method. Whenever a page appears, keyboard focus should be set on an element that my customer’s likely going to want to interact with immediately.
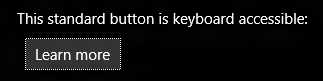
Figure 4: The first button on the keyboard page showing visually that it has keyboard focus.
There’s also another element on the page that doesn’t look visually like a button. But given that it is in fact just a styled Button control, (and the styling includes keyboard focus feedback,) it is keyboard accessible. I lifted the bulk of the code for that button from one of the XAML app samples in the Windows SDK.
By default the styled element shows the standard rectangular keyboard focus visual feedback associated with Button controls, but I turned that feedback off by setting the button’s UseSystemFocusVisuals property to false. The only focus feedback that the element shows now is the custom keyboard focus feedback defined the ControlTemplate for the button.
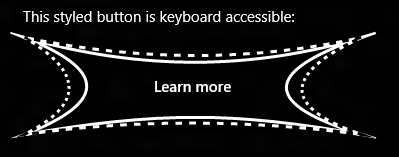
Figure 5: The styled button on the keyboard page showing visually that it has keyboard focus.
The sections below describe some of the issues your UI may hit regarding keyboard accessibility.
1. Let your customer move keyboard focus to the element that they want to interact with.
After building your custom UI you may find that you can’t move keyboard focus to an element that your customer needs to interact with. One of the buttons in the keyboard page in the demo app can’t be tabbed to, and it’s completely inaccessible to a customer who only uses the keyboard.
I hit this issue myself after building a UserControl for a shipping app. After having built the UI, I got a bug logged against me saying that my customer needs to be able to press the Tab key to set keyboard focus to the element, and then press the left and right arrow keys to trigger some action on the element. In the case of my UI, I just needed to set the IsTabStop property to true on the element, and the XAML framework then inserted the element into the tab order.
Don’t trip up like I did…
I wrote my first Windows Store app in HTML, and used the tabIndex property to insert some custom UI into the tab order. When I later needed to do something similar in a XAML app, I messed around for a while with the TabIndex property before discovering that I really should have been using IsTabStop.
While the same principles apply around keyboard accessibility regardless of the UI framework you’re using, the implementation details are different.
2. Let your customer know which element has keyboard focus.
Another button on the keyboard page in the demo app can get keyboard focus, but its visuals don’t change at all when it has focus. So a sighted customer doesn’t know it has focus, and in many situations, this renders the element inaccessible in practice.
This is the sort of situation where the Inspect SDK tool can be so valuable. When it’s not clear to me where keyboard focus is, I let Inspect show me by having the tool track keyboard focus.
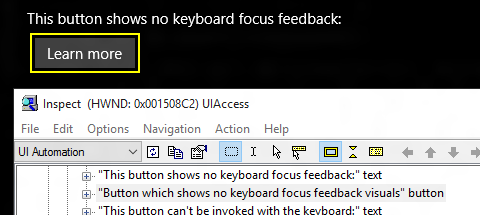
Figure 6: The Inspect SDK tool reporting that keyboard focus is on a button which shows no keyboard focus visual feedback.
On a side note, when I unplugged my mouse for nine months and only used a keyboard to interact with Windows and all the apps I need for work, I did hit some external web sites that didn’t show visual keyboard focus feedback when focus was on any links on the page. I really learnt the value of clearly showing keyboard focus feedback then.
And going back to the bug logged against my own UserControl, I updated its ControlTemplate to show keyboard focus visuals in the same way that’s illustrated in the code snippets at Implementing keyboard accessibility (XAML).
3. Let your customer interact with the element once it has keyboard focus.
The next thing to consider, after allowing your customer to move keyboard focus to the button and letting them know they’ve done that, is making sure you’re allowing them to interact with the button. I’ve reviewed an app where some items in a list can get keyboard focus, but nothing happens when you then press Enter or the Spacebar, despite a click or tap on the item triggering some action just fine.
The classic reason for this is that an element has a pointer-related event handler set on it, and that handler doesn’t get called when your customer tries to interact with the element via the keyboard. The last button on the demo app page has a PointerPressed event handler set, and is not keyboard accessible despite giving the impression visually that it is.
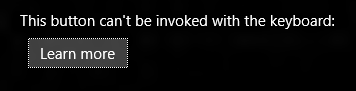
Figure 7: A button with keyboard focus which can’t be invoked with the keyboard.
When you hit this in your UI, you might be tempted to add a key-related event handler to the element. For example, add a KeyDown event handler to detect when the Enter key is pressed, and in response to the key down event, run the same code as you do when a tap occurs on the element. And indeed, that might make the element interactable through the keyboard.
But be very careful here. Not only must your customer be able to tap, click and use to keyboard to interact with the element, but they must be able to interact with the element when using the Narrator screen reader through touch. That means the element must be programmatically accessible. (More details on programmatic accessibility will be discussed in Building accessible Windows Universal apps: Programmatic accessibility). If you add a key event handler, the element may still be inaccessible programmatically, and you may need to add more code to fix that issue too. It’s often far less work to make the element a standard Button control, with a Click event handler, and to style it however you like. The Button’s Click handler will get called in response to a tap, mouse click, an Enter key press, and also when Narrator or another UIA client app programmatically invokes the Button.
And one more thing to watch out for if you go with the approach of adding your own KeyDown event handler; check whether a press & hold on the key leads to the calls to your event handler auto-repeating. You probably won’t want any significant action rapidly being repeated as your customer does a press & hold on a key. And remember that some of your customers might not have the physical ability to release a key quickly. One way to avoid issues with auto-repeat can be to use a KeyUp event handler instead.
In the case of my own shipping app, I did add a key-related event handler to my UserControl to detect a press of the left and right arrow keys and to take specific action in response. I then had to do the work to make sure the UI was fully programmatically accessible too. I did this with this particular UI, despite the fact that by default, I’d always choose to let the XAML framework do the work for me.
Summary
Wherever possible, let the UI framework do most of the work to help your customers who only use the keyboard. By using standard controls such as buttons and list items, (and styling them if you want to,) you’ll get a lot of the functionality for free.
Where the implementation of your UI means that some functionality is not keyboard accessible to your customers by default, take action as required to:
1. Allow your customers to tab to all your interactable UI.
2. Let them know where keyboard focus is at all times.
3. Allow them to use the keyboard to trigger all the actions that can be triggered through touch or mouse. (For example, invoke, select, scroll, expand/collapse.)
Also consider the efficiency of the experience with the keyboard. When your customer tabs through the UI, provide an intuitive tab order, so keyboard focus doesn’t bounce around and become difficult to follow. And adding keyboard shortcuts is a great way to save your customer valuable time when they want to trigger commonly accessed actions in your app, such as Search or Back.
By making the keyboard experience efficient, you’re going beyond making your app “technically accessible”, and instead delivering something that your customer will feel pleasure in using. If you’re able to use a keyboard, try accessing all your app’s functionality for a while, only using the keyboard. Are you proud of the experience you’ve built?
References
XAML
Implementing keyboard accessibility (XAML)
Control.IsTabStop property
Control.TabIndex property
Control.UseSystemFocusVisuals property
Control.Focus method
UIElement.KeyDown event
WinJS
Implementing keyboard accessibility (HTML)
IHTMLAnchorElement::tabIndex Property
focus method
keydown | onkeydown event
An accessibility case study - Reading List. Part 3: Keyboard accessibility
Posts in this series
Building accessible Windows Universal apps: Introduction
Building accessible Windows Universal apps: Keyboard accessibility
Building accessible Windows Universal apps: Colors and contrast
Building accessible Windows Universal apps: Programmatic accessibility
Building accessible Windows Universal apps: Other important accessibility considerations